The detail that separates a memorable Halloween manicure from a forgettable one is almost always a face — a tiny painted expression on a pumpkin, a ghost with just two wobbly dots for eyes, a black cat caught mid-grin. These miniature characters transform nails from seasonal color palettes into wearable storytelling, and that’s exactly why Halloween pumpkin nail characters 2026 have shifted so dramatically toward illustrated personality over simple motifs. This year, the trend is less about stamping a generic jack-o’-lantern onto orange polish and more about giving each nail its own scene, its own creature, its own mood.
The guiding principle worth carrying through every design in this collection is simple: choose one character nail as your anchor and let every other finger exist in service of that moment. When a single nail carries a detailed ghost or a hand-painted cat face, the surrounding nails should support it with complementary texture, pattern, or solid color — never compete. That restraint is what makes character nails look intentional rather than chaotic, and it’s the difference between nail art that reads as costume-y and nail art that reads as genuinely stylish.
1. Vintage Black Cat Cameo on Warm Brown With Tortoiseshell Accent
This set opens with a rich, moody autumn palette — deep chocolate brown, warm cream, burnt orange — but the nail that stops you is the ring finger, where a hand-painted black cat sits inside an ornate oval frame like a Victorian cameo portrait. The cat’s face is detailed with a crescent moon above its head and decorative scrollwork bordering the edges in brown and cream. The framing device is what elevates this beyond a simple cat doodle; it gives the character architectural context. On the index finger, a glossy tortoiseshell finish adds depth without competing, while the pinky carries a brown-and-cream checkered pattern with tiny black dots scattered across it.
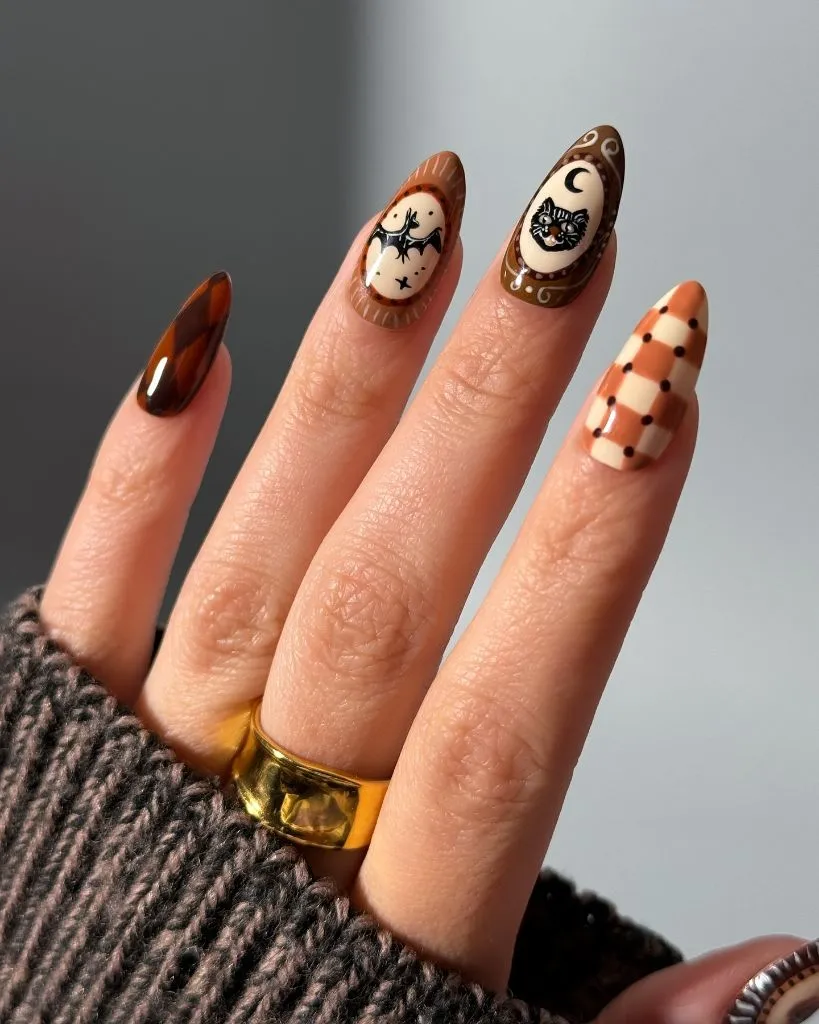
The balance here works because the tortoiseshell nail and the checkered nail both reference the same warm color family without introducing any new focal imagery. Your eye lands on the cat cameo and stays there. The bat on the middle finger — small, black, floating against cream inside a brown scalloped border — acts as a secondary character that echoes the Halloween theme without overwhelming the cat’s starring role. Every nail speaks the same visual language, just at different volumes.
To recreate this, start with a deep brown base on your index finger and build the tortoiseshell effect using amber and black swirls under a glossy top coat. For the cat cameo, outline the oval frame first with a thin brush before painting the cat silhouette inside — working from the frame inward gives you cleaner proportions. Avoid making the checkered pattern too tight on the pinky; larger squares keep it readable at nail scale and prevent it from looking busy next to the detailed character nails.
2. Scream Ghost With 3D Stitches and Candy Corn on Cream Almond Nails
The standout here is the index finger, where a sculpted 3D ghost face — unmistakably referencing the Scream mask — rises off the nail surface in white gel with deep black hollowed eyes and an elongated mouth. The dimensionality is what makes this design arresting; it casts actual shadows across the nail. Beside it, the middle finger features a nude base split by a vertical line of raised silver stitches over a dark red wound, creating a Frankenstein-meets-surgical effect. The ring finger carries a clean black spider, and the pinky tucks in a single candy corn against a sheer nude base.
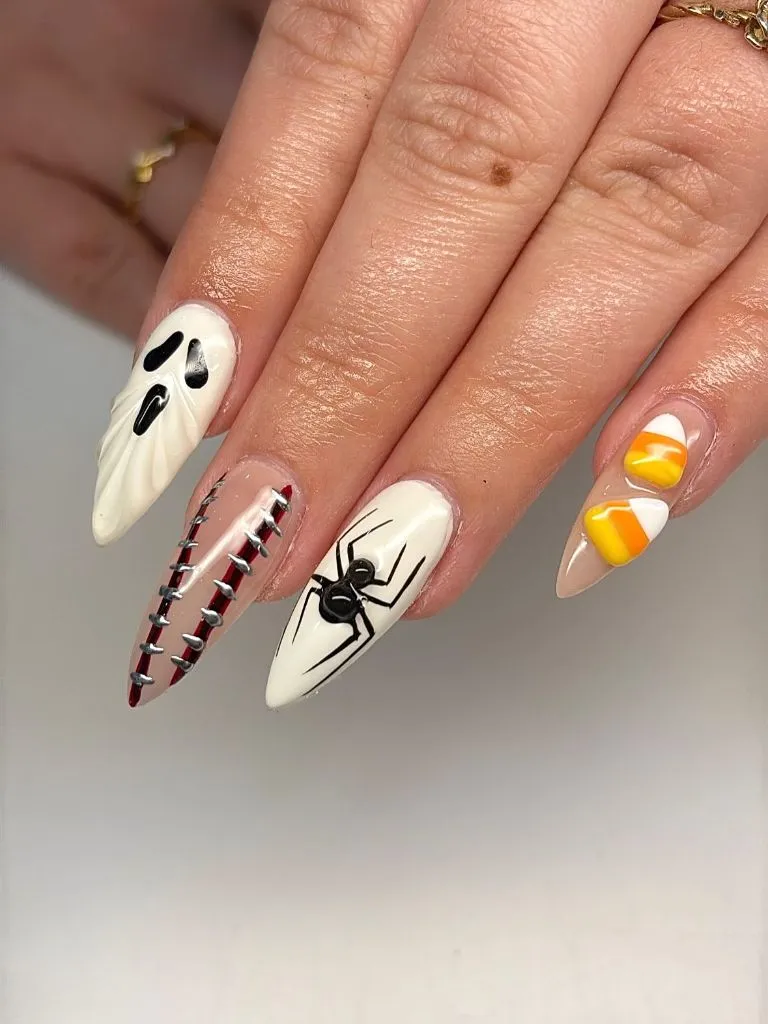
What makes this set cohesive despite four completely different motifs is the shared commitment to a cream-and-black palette with strategic red only on the stitched nail. The candy corn on the pinky introduces orange and yellow, but it’s so small and isolated that it reads as a playful punctuation mark rather than a color disruption. The spider nail acts as a bridge — black illustration on white, linking the dramatic ghost to the subtle candy corn. If you enjoy mixing spooky character nails with simpler accents, you might also appreciate the approach in Halloween nail art 2026 wearable looks.
For the 3D ghost, build the face in layers using thick builder gel, letting each layer cure before adding height — rushing this step flattens the dimensionality that makes the whole design work. The stitches can be achieved with tiny silver metallic strips or hand-drawn lines with a dot tool for the thread holes. Avoid adding 3D elements to more than two nails in a single set; the tactile impact of sculpture works best when most nails stay flat.
3. Tortoiseshell Pumpkin Tips With White Ghosts on Short Natural Nails
This design proves that short nails can carry Halloween character art beautifully. The majority of the nails feature a tortoiseshell pattern — swirls of amber, brown, and black — but the magic is on the accent nails, where small white ghosts float against a sheer pink base, framed by gold-outlined tortoiseshell shapes that create little windows for the characters. The ghosts are minimalist, just a simple white silhouette with two black dot eyes, and that simplicity is precisely why they work against the complex, organic tortoiseshell texture surrounding them.
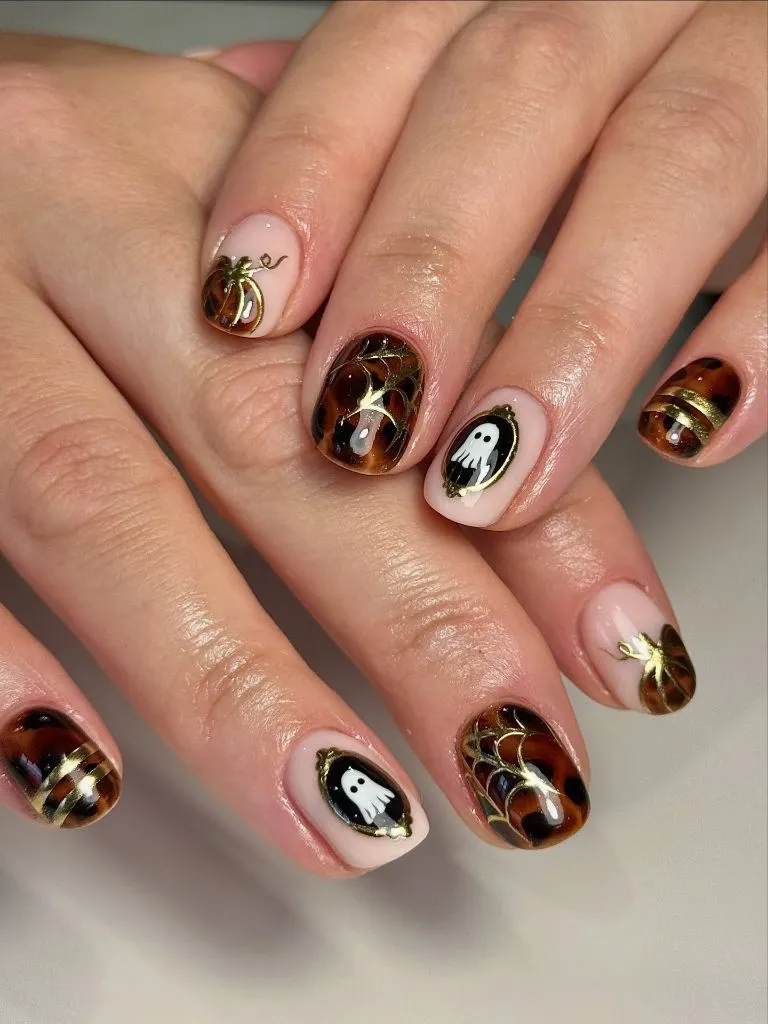
The gold outlining on the tortoiseshell patches is the connective tissue of this set — it appears on both the character nails and the solid tortoiseshell nails, creating visual unity across very different designs. The pumpkin tips on the thumb and index finger, rendered in the same amber tortoiseshell tones with gold vine accents, tie the Halloween theme back to the autumn palette without needing cartoonish orange. It’s a sophisticated way to reference pumpkins through color and shape rather than literal illustration.
If you have shorter nails and want to try this, keep ghost characters at the base or center of the nail rather than the tip, where they’ll wear off quickly. Use a fine liner brush for the gold outlines and keep them consistent in thickness across all nails. This look pairs well with the approaches discussed in fall medium length nails 2026 if you want to extend the idea to slightly longer shapes.
4. Neon 3D Bubble Art With Pumpkin Faces and Spider on Coffin Nails
This is maximalism done right. Long coffin-shaped nails are loaded with raised 3D bubble textures in neon green, orange, pink, and purple, and each nail carries a different Halloween character — a grinning pumpkin face, a spider on a pink-to-orange gradient, a small white ghost peeking out from a neon pink border, and bats silhouetted against a star-scattered nude base. The textured bubble borders frame each scene, creating the effect of candy-colored picture frames around each spooky illustration.
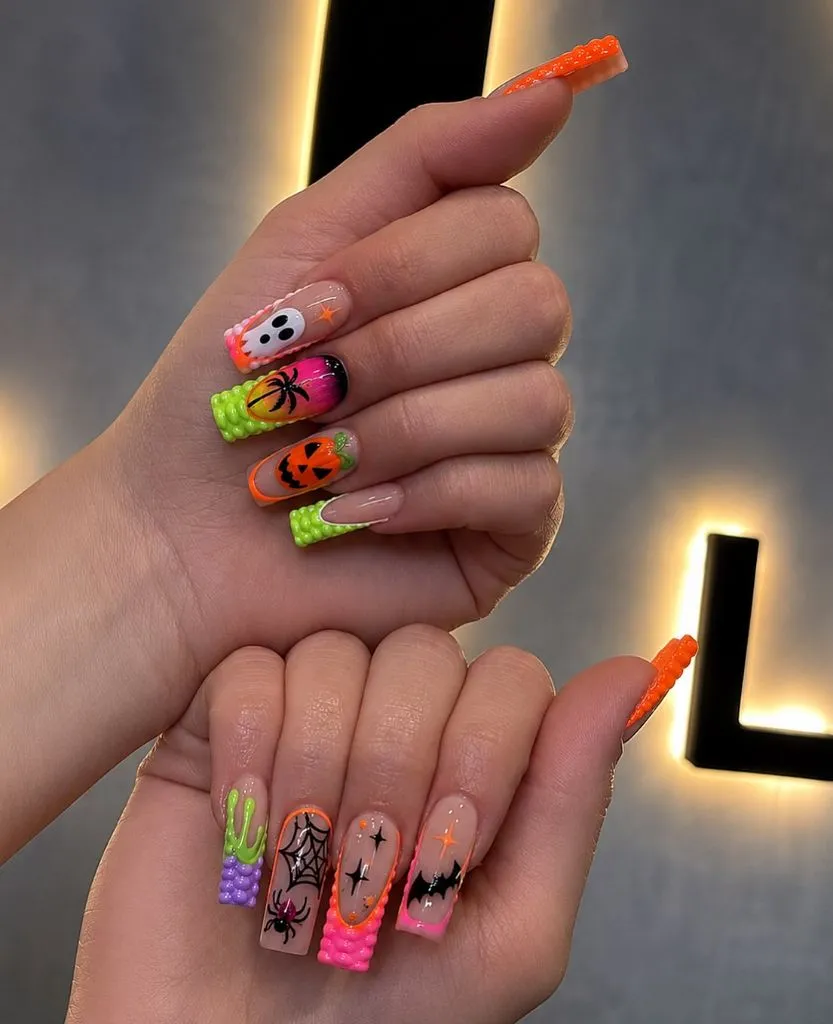
The reason this busy set doesn’t collapse into visual noise is the consistent framing device — every nail uses the same raised-dot border technique, even when the colors change. That structural repetition holds the chaos together like a gallery wall where different paintings share identical frames. The nude base visible on several nails also provides breathing room, preventing the neon from becoming relentless. The pumpkin face nail is the strongest character moment, with its jack-o’-lantern grin reading clearly even at this level of surrounding detail.
To attempt this style, invest in a quality 3D gel that holds its shape during curing — cheap gels flatten and lose the dimensional pop that makes this design special. Pipe the bubble dots in concentric size gradations, largest at the base of the nail and smallest near the tip, to create a sense of perspective. Avoid using more than three neon colors per hand; this set works because it limits itself to green, orange, and pink with purple as a quiet accent.
5. Airbrushed Ghost and Jack-o’-Lantern Patch With Orange Gem Starbursts
Here, the character work is genuinely painterly. The middle finger features a white ghost rendered with soft shading and a slightly melancholic expression, set against a dark glittery background with tiny black star silhouettes scattered around it. Next to it, the ring finger displays a cluster of golden-orange jack-o’-lanterns with green vines, painted with enough depth and shadow to look almost like a miniature oil painting. The thumb and pinky carry orange-to-nude gradient tips with starburst designs radiating from embedded amber gems.
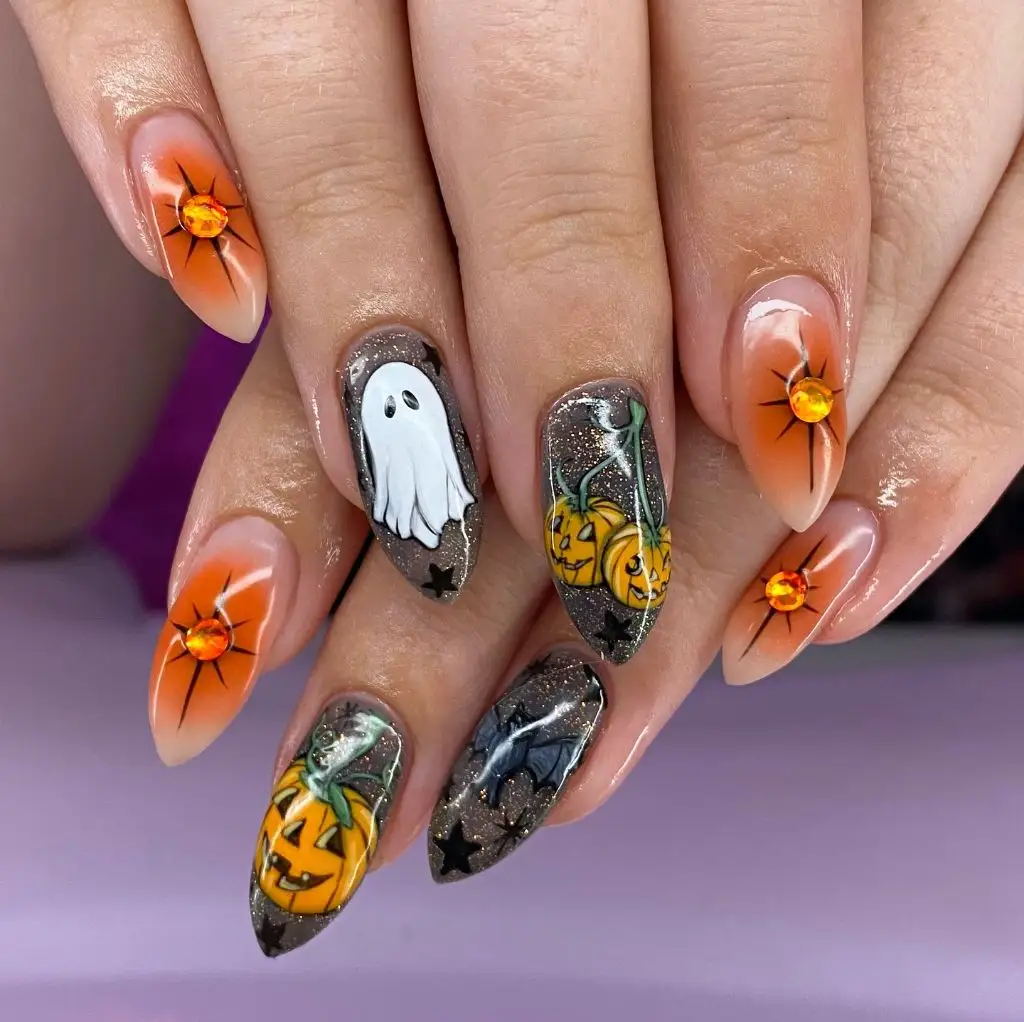
The starburst gem nails are the unsung heroes of this set — they introduce the orange palette that connects the character nails without adding more illustration, giving your eye a place to rest between the ghost and the pumpkins. The glitter in the dark background nails catches light differently than the metallic gems, creating varied texture across the set without adding more imagery. It’s a masterclass in supporting detailed character art with strategic simplicity.
Recreate the ghost by airbrushing a soft gray shadow around a white base shape, then add details with a fine brush once the airbrush layer is cured. For the pumpkin patch, paint the pumpkins first in flat orange, then add shadow and highlight with darker and lighter orange tones — the vines go last, in thin green lines that overlap the pumpkin edges. Avoid flat, uniform orange on the pumpkins; the dimensional shading is what makes them read as characters rather than circles.
6. 3D Black Cat With Pumpkin and Striped French Tips in Autumn Tones
This design leans into charm. The thumb nail features a tiny 3D black cat sculpture perched on the tip, wearing an orange star, positioned next to a small 3D pumpkin — both raised off the surface and genuinely sculptural. The remaining nails mix striped French tips in brown, orange, and cream with sheer pink bases, and small pearl accents scattered across the surface add a delicate, almost bakery-window sweetness to the Halloween theme.
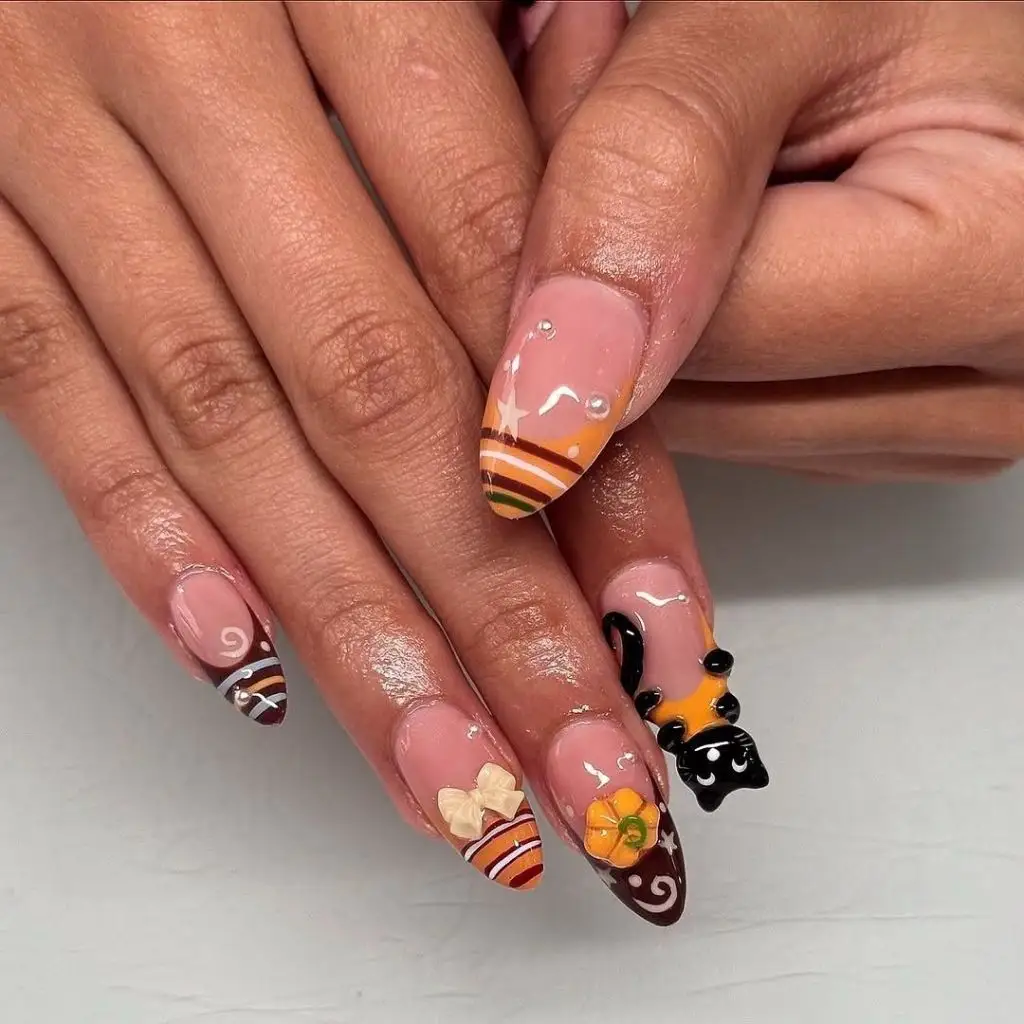
The sweetness is the point. By keeping the color palette in warm caramel, rust, and cream rather than stark black and neon orange, the Halloween characters feel cozy instead of creepy. The striped tips reference the visual language of candy and harvest rather than horror, and the pearls reinforce that soft, whimsical register. The 3D cat is small enough to be a surprise detail rather than a statement piece, which makes it more charming — you notice it up close, like spotting a brooch on someone’s lapel.
For the 3D cat, sculpt the body from black builder gel in stages, curing between each addition to maintain structural integrity. Keep the cat under 5mm tall to avoid snagging. The striped tips work best when you tape off each stripe rather than freehanding, which keeps the lines crisp against the sheer base — this matters more at the smaller scale of a nail than it would on canvas.
7. Matte Red Toadstool Mushroom Nails With Speckled Black Accents
Technically autumnal rather than strictly Halloween, this set earns its place through the slightly sinister energy of its amanita mushroom characters — red caps with white spots, rendered in a flat matte finish that makes them look like vintage botanical illustrations. The character nails feature detailed mushrooms with white stems and green leaves against a nude base, while alternating nails carry a matte red with scattered black speckles that echo the mushroom’s spotted caps.
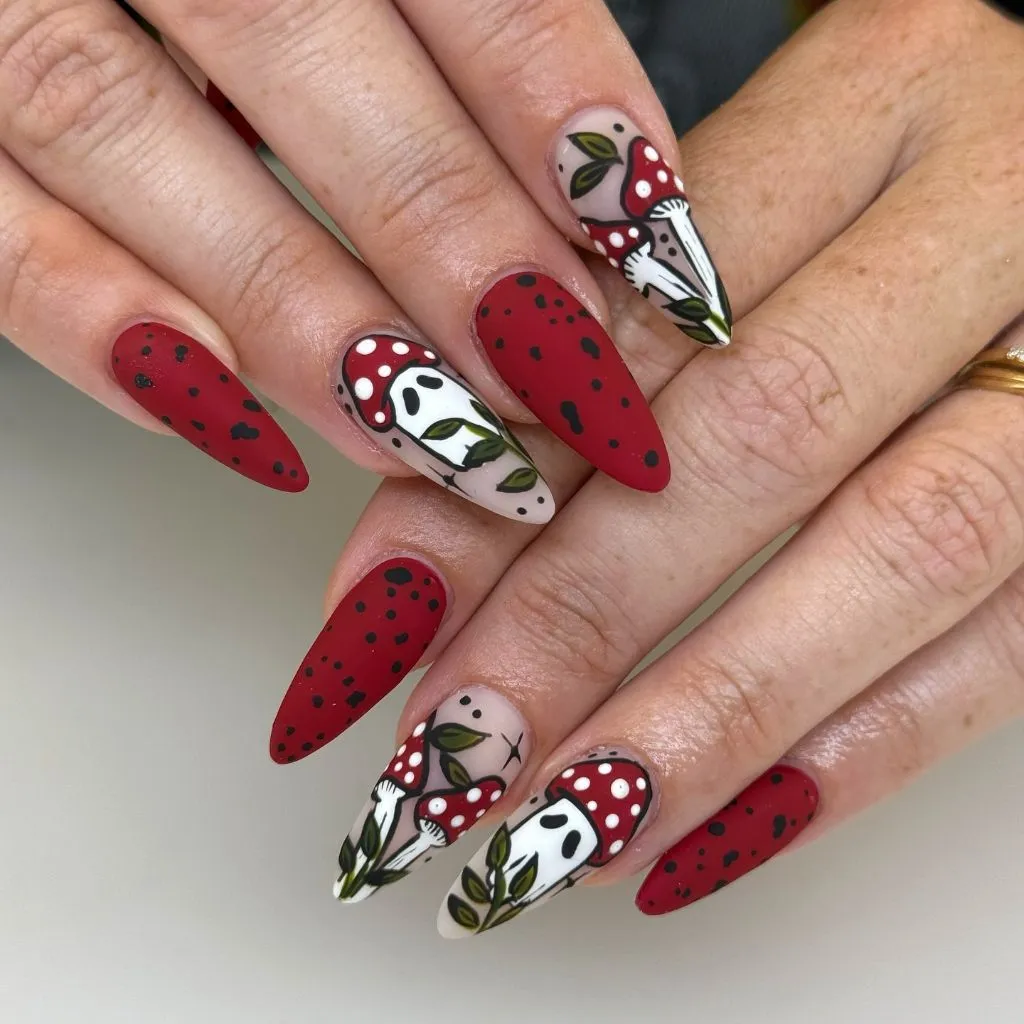
The matte finish is doing more work than you might initially notice — it flattens the red into something that reads as earthy and organic rather than glossy and festive. The black speckles on the solid red nails create a visual bridge to the white spots on the mushroom caps, so even the non-character nails reference the mushroom motif indirectly. This is a clever way to build thematic cohesion without repeating the same illustration on every finger. If you’re drawn to this matte approach, explore matte fall nail designs 2026 for more inspiration.
To get the botanical illustration quality, outline the mushroom shapes in thin black lines before filling with color — the outlines are what give these a drawn, storybook quality rather than a painted one. Use a matte top coat on every nail including the character nails; mixing matte and glossy finishes here would break the vintage cohesion. Avoid painting the mushroom stems in pure white; a slightly warm cream makes them sit more naturally against the nude base.
8. Vintage Circus Halloween Characters With Harlequin Diamond and Polka Dot Mesh
This set has the energy of a 1940s Halloween card come to life. A black cat in a party hat, a ghost wearing a bow tie, a grinning pumpkin in a ruffled collar — each character is painted in a retro illustration style with warm orange, black, and cream on different nails. Between them, accent nails alternate between red-and-white harlequin diamonds and black mesh with polka dots, creating a vintage circus tent atmosphere.
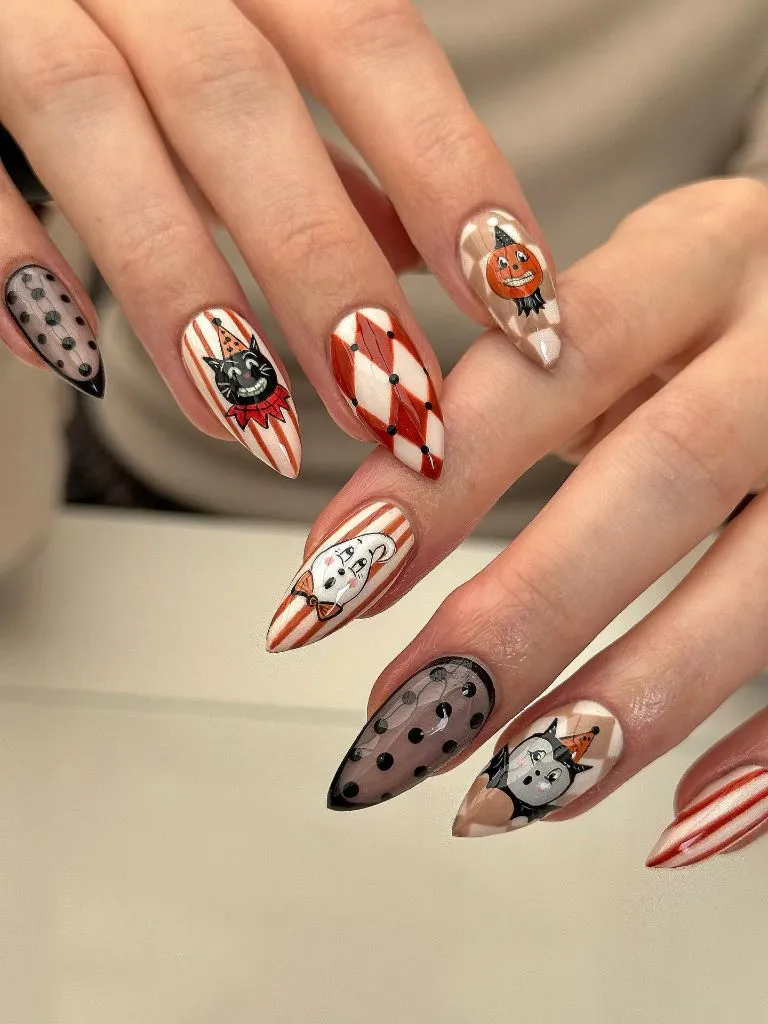
The genius of mixing three different characters across one set without it feeling disjointed is the consistent illustration style — every character shares the same line weight, the same slightly naive drawing quality, and the same limited color palette. The harlequin and polka dot nails aren’t random pattern choices either; they reference circus and carnival aesthetics, which contextualizes the party-hat-wearing characters. It’s worldbuilding at the scale of a manicure. If you love the polka dot fall nails 2026 trend, this is its Halloween evolution.
When painting multiple characters in one set, sketch them all on paper first to establish a consistent style — the most common mistake is drawing the cat realistically and the ghost cartoonishly, which breaks the illusion of a shared world. Use the same brush size for all character outlines. The mesh polka dot nails work best with a sheer black base that lets skin show through, mimicking actual tulle fabric rather than opaque black with dots on top.
9. Minimalist Ghost and Spiderweb Hearts on Nude Short Nails
Proof that Halloween pumpkin nail characters 2026 aren’t only for long, dramatic nails — this short, rounded set keeps everything pared back to the essentials. One nail features a small white ghost with a wavy bottom edge, another has a white spiderweb with a black heart at its center, and a third sports a black French tip with cat-ear peaks. The remaining nails are either bare nude or carry tiny black drip accents at the tips.
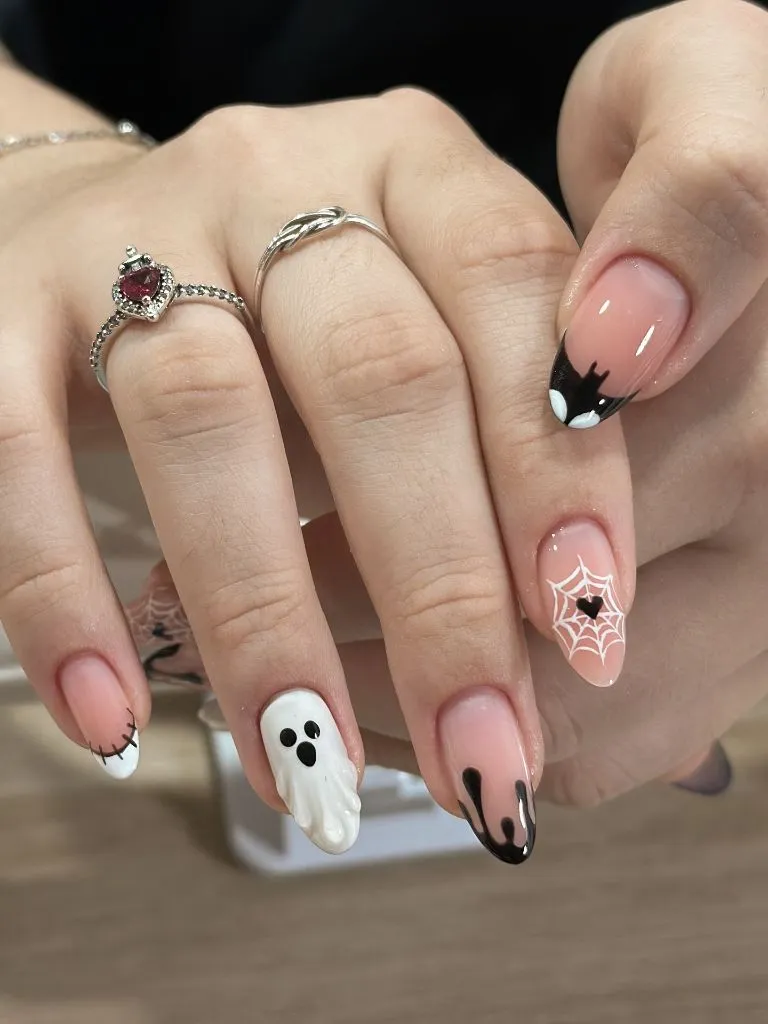
The restraint is the entire statement. By limiting the palette to nude, white, and black and keeping every motif small, this set proves that character nails don’t require elaborate illustration or bold color to communicate personality. The spiderweb-with-heart is a particularly smart detail — it takes a Halloween cliché and makes it feel romantic and personal rather than seasonal and disposable. The cat-ear French tip is another example of suggesting a character through shape alone, without drawing a full face.
Recreate the ghost using thick white gel polish applied with a small dotting tool for the body and a needle for the wavy tail — the imperfection of the edges is part of the charm. The spiderweb lines should be drawn in white from one corner of the nail outward, with the black heart placed slightly off-center within the web for a more organic feel. Avoid adding more than three motif nails per hand in a minimalist set; the empty nails are as important as the decorated ones.
10. Purple Ombré Stiletto Nails With Spiders, Bats, and Jack-o’-Lantern Silhouettes
These dramatic stiletto-shaped nails fade from sheer pink at the cuticle through vivid purple to black tips, and every single nail carries a different Halloween character silhouette — spiders, bats, jack-o’-lanterns, spiderwebs — rendered in black against the purple gradient. Small green crystal gems are placed strategically near the cuticle line, adding a witchy sparkle that catches light as the hand moves.
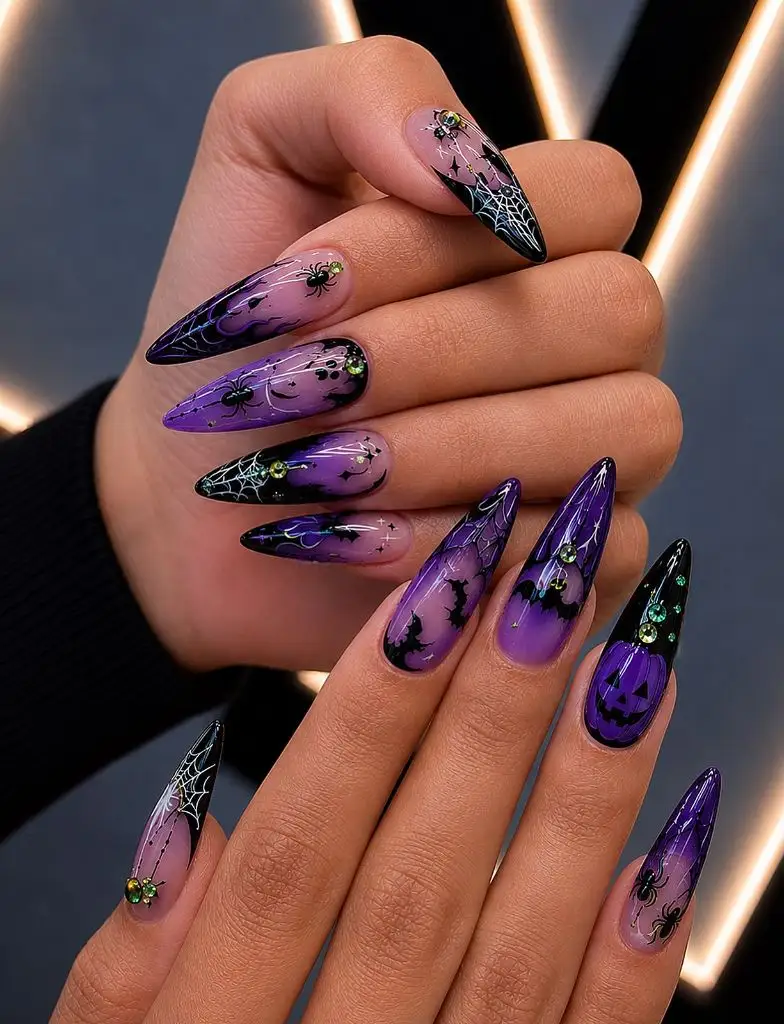
The gradient does most of the heavy lifting here — by establishing a single dramatic color transition that repeats across all ten nails, it creates unity even when every nail has a different character. The black silhouettes read clearly against the purple middle zone of the gradient, which is the perfect value range for contrast without harshness. The green crystals are an unexpected color choice that references poison, witchcraft, and the supernatural without being literal about it. For more ideas pairing bold colors with Halloween themes, see Halloween nail designs 2026.
Build the ombré with a makeup sponge, dabbing three colors — sheer pink, vivid purple, and black — in overlapping zones and blending at the transitions. Paint the character silhouettes only after the ombré is fully cured, and keep them positioned in the purple-to-black transition zone where they’ll be most visible. Avoid placing characters too close to the cuticle where the base is sheer pink; they’ll look orphaned rather than embedded in the design.
11. Jellycat-Inspired 3D Pumpkin and Croissant Charms With Plaid and Polka Dots
This whimsical set translates plush toy aesthetics into nail art. The ring finger features a raised 3D pumpkin charm that unmistakably references the popular Jellycat plush style — round, smiling, with a green stem — sitting on the nail surface like a tiny sculpture. Another nail carries a similar 3D croissant character. The supporting nails alternate between orange polka dots on white and a warm orange-and-brown plaid, creating a cozy autumn brunch atmosphere that happens to include Halloween characters.
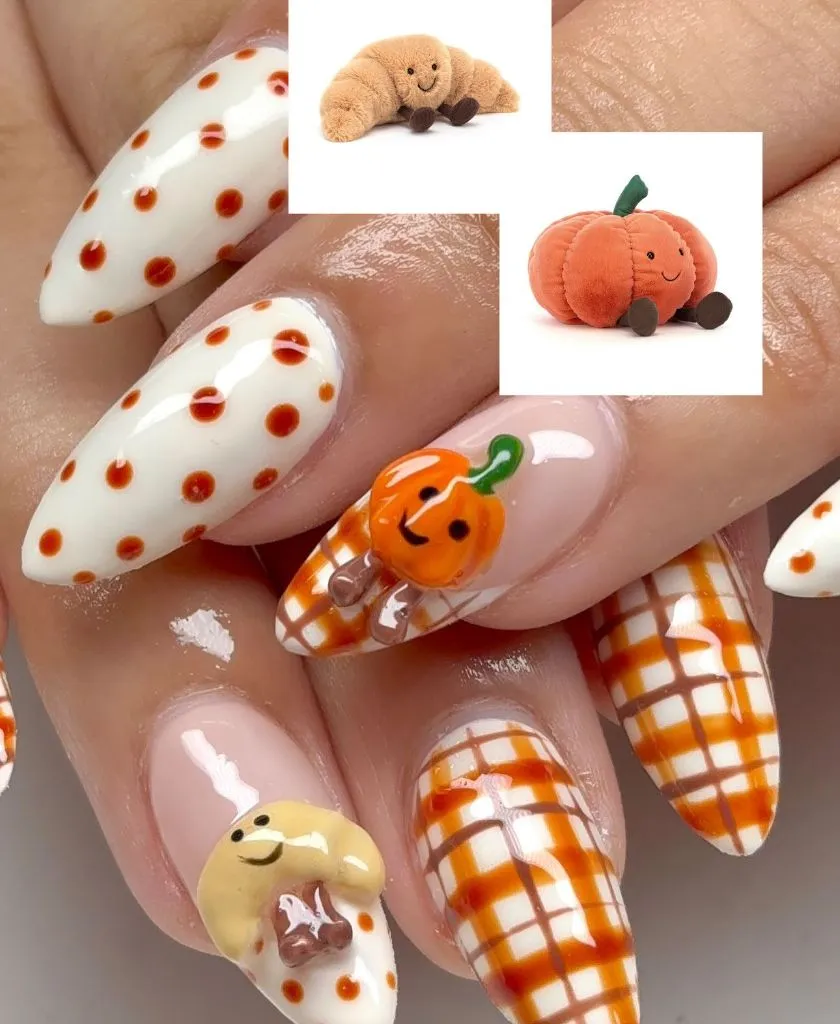
The plaid and polka dot nails are doing crucial work establishing the autumnal context that makes the character charms feel seasonal rather than juvenile. Without them, a 3D pumpkin sitting on a plain nail might read as a children’s design; framed by sophisticated patterns in a warm harvest palette, it reads as playful-chic. The polka dots are deliberately imperfect in size and spacing, which matches the handcrafted, slightly wobbly quality of the 3D charms themselves.
Sculpt the 3D charms from colored builder gel, keeping the total height under 4mm for durability. The plaid pattern requires a steady hand and ideally a striping brush — paint the vertical lines first, let them cure, then cross with horizontal lines in a slightly different shade. Avoid making the 3D charms too large relative to the nail; they should occupy roughly a third of the nail surface to leave room for the eye to register the base design.
12. Subtle Silver Glitter Pumpkin With Ghost and Spiderweb on Pink Short Nails
This is Halloween for the person who doesn’t usually do Halloween nails. A sheer pink base dominates, with one nail featuring a silver glitter pumpkin with a black bow, another showing a tiny white ghost surrounded by black sparkle accents, and a third carrying a corner spiderweb in the French tip zone. The rest of the nails are essentially bare, with just a hint of white at the tips and the occasional small black star.
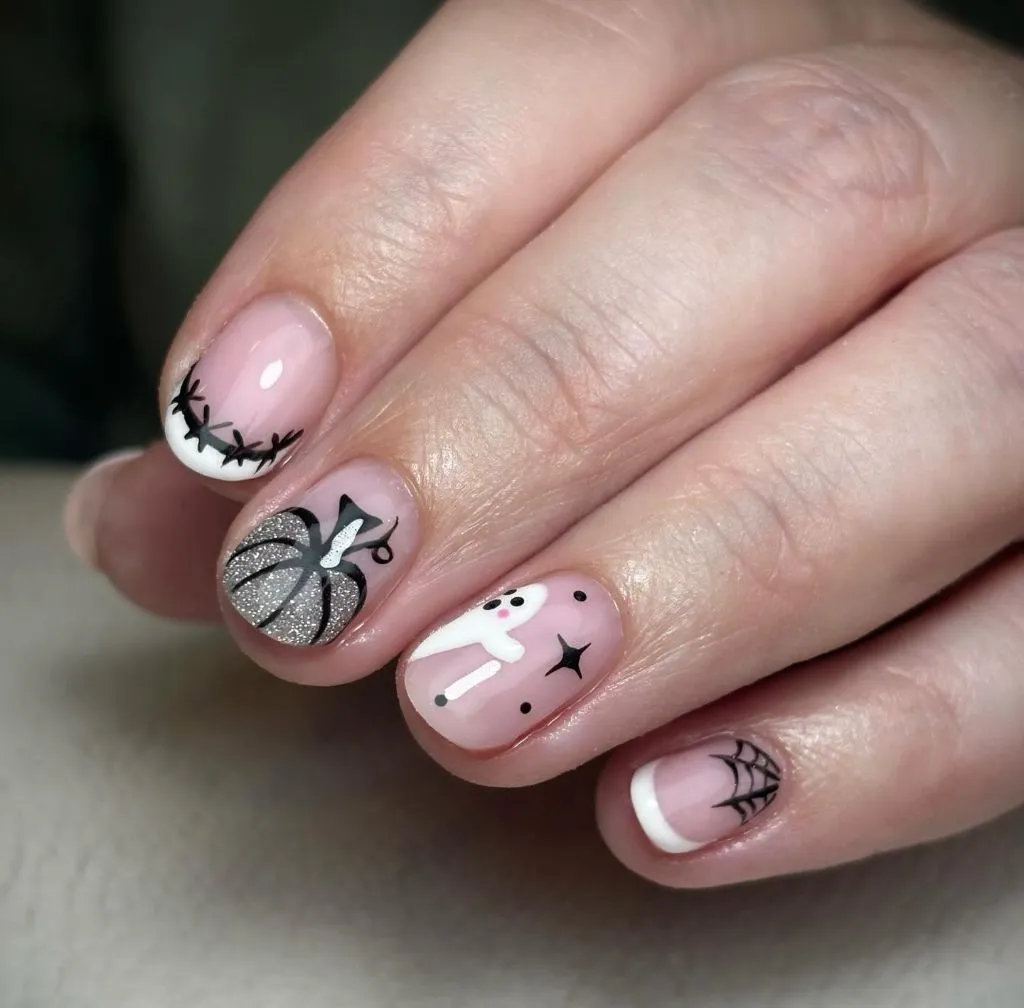
The silver glitter pumpkin is the smartest detail — by rendering the pumpkin in silver rather than orange, it removes the literal seasonal color and transforms the character into something closer to jewelry. The black bow on top adds a feminine, almost gift-wrapped quality. This approach to character nails works for workplaces or occasions where full Halloween art might feel too casual; the characters are present but whispered rather than shouted. If you lean toward subtle seasonal nails, nude fall nails 2026 offers more ideas in this register.
For the silver glitter pumpkin, paint the pumpkin shape first in silver glitter polish, then outline the segments with thin black lines after curing. The ghost should be painted in slightly off-white rather than bright white to keep it soft against the pink base. Avoid making the spiderweb too precise; a slightly hand-drawn quality keeps the minimalist nails from looking like decal work.
13. Dark Burgundy and Burnt Orange With Ghost Lip and Pumpkin Tip Accents
This elegant set keeps the character work confined to two nails while the rest carry rich, glossy color. The index finger is a deep, almost wine-dark burgundy. The middle finger is sheer pink with a small pumpkin half-visible at the tip, as if peeking up from below. The ring finger glows with a metallic burnt orange shimmer. And the pinky features a dark burgundy base with a gold-outlined lip shape containing a tiny white ghost inside it — like a supernatural cameo brooch.
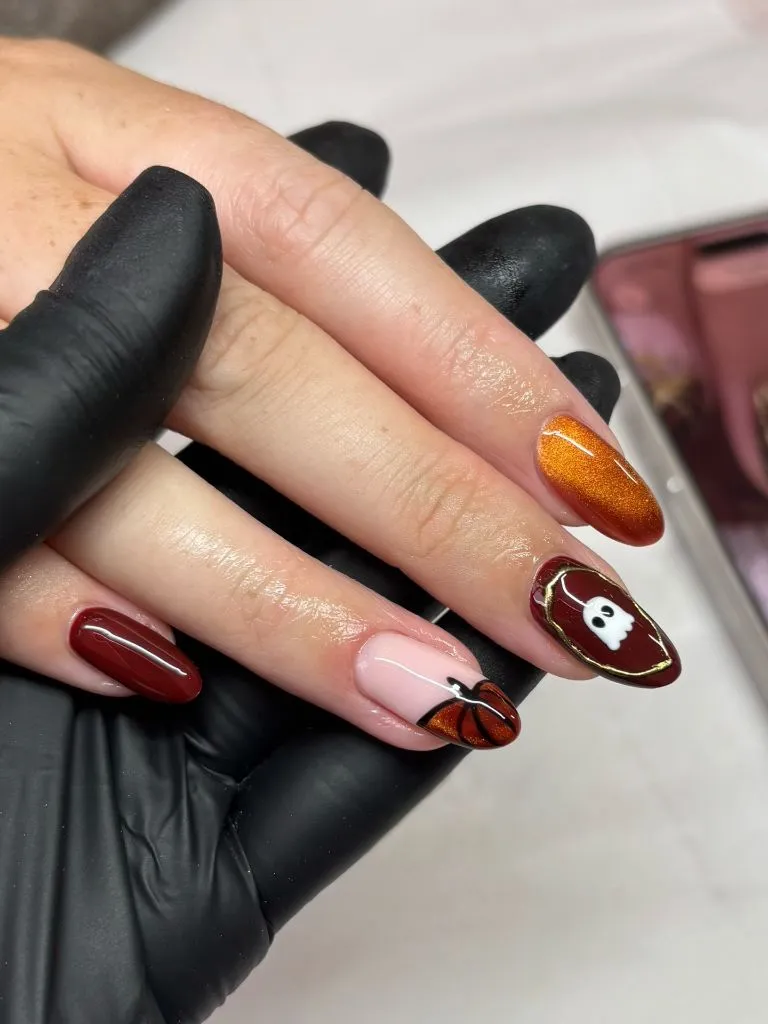
The ghost-inside-a-lip motif on the pinky is the most inventive detail in this entire collection. It takes two completely unrelated shapes — a classic lip and a ghost — and nests one inside the other, creating something that feels like a fashion illustration rather than seasonal nail art. The gold outline elevates it further, making it read as intentional and designed rather than playful. Combined with the maroon fall nails 2026 palette on the surrounding nails, this is Halloween character art for someone who wants sophistication first and theme second.
The pumpkin tip on the middle finger is achieved by painting only the upper half of a pumpkin shape at the very tip of the nail, so it appears to be rising into frame. This half-visible technique works on medium to long nails — on very short nails, there isn’t enough tip real estate for the illusion. Use a shimmer or cat-eye polish for the burnt orange nail to differentiate its texture from the burgundy creme finish beside it.
14. Gory Scream Mask With Blood Drips and Spider on Black-and-Red Almond Nails
For those who want their Halloween nails genuinely scary rather than cute, this set commits fully to horror. The middle finger features a Scream-style ghost face splattered with red blood effects, the index finger is solid black with red drip accents flowing down from the cuticle, the ring finger has an orange pumpkin with a black spider hanging from it, and the pinky is nude with aggressive red blood splatter. A small bat silhouette on the thumb rounds out the set.
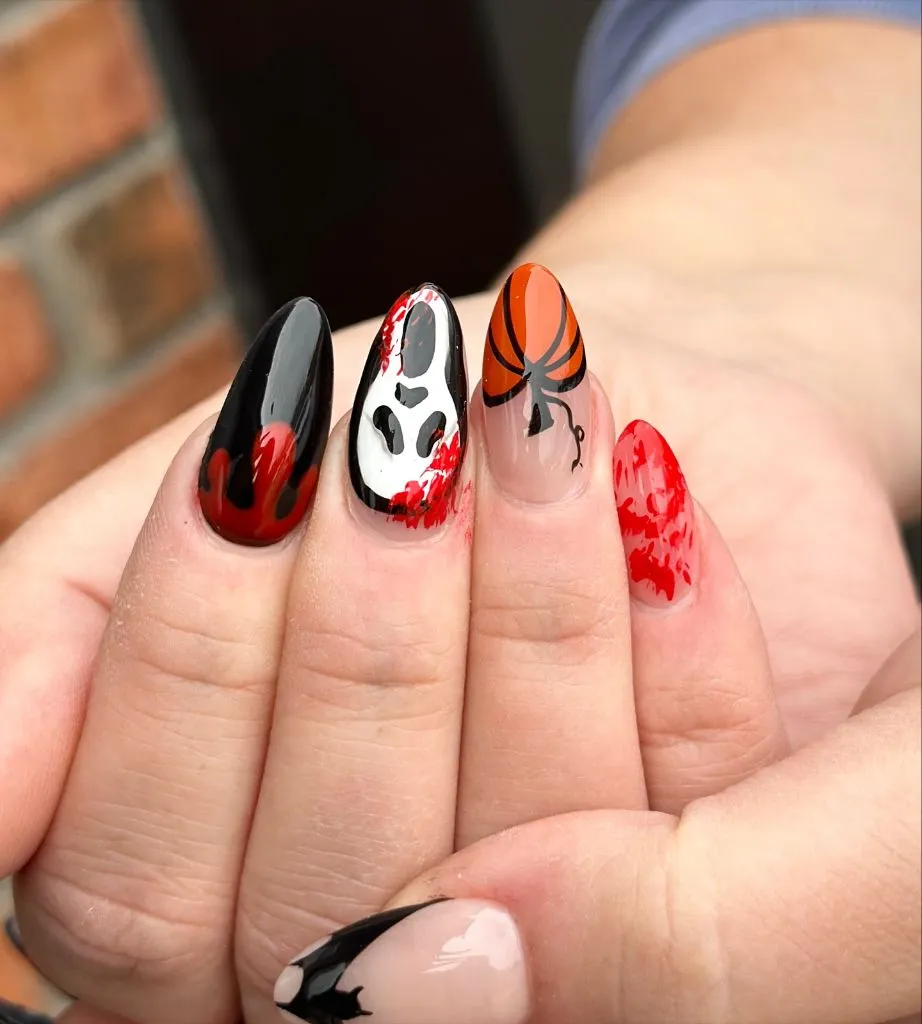
The blood splatter is what unifies these otherwise disparate motifs — it appears on the ghost face nail, the drip nail, and the pinky, creating a throughline of gore that ties the set together thematically. The orange pumpkin-and-spider nail provides a brief color interruption that actually heightens the impact of the red on either side by contrast. This is the opposite approach from the subtle sets above, and it works precisely because it doesn’t hedge; it’s fully committed to the horror register.
For convincing blood drips, use a deep red gel and apply it thickly at the cuticle, then drag it downward with a thin brush, tapering the line as you go — gravity should dictate the shape. The splatter effect on the pinky requires flicking diluted red polish from a brush tip onto the cured nude base, which is messy and requires masking the skin around the nail. Avoid using bright cherry red; a darker, more maroon-toned red reads as more realistic and less cartoonish.
15. Pink Cottagecore Pumpkin With Gingham Tips and 3D Floral Accents
This set reimagines Halloween through a cottagecore lens, replacing the typical spooky palette with soft pink, peach, and orange. The middle finger features a hand-painted pumpkin in blush tones sitting against a pink base, with lace-like white detailing around the edges. The tips on other nails carry an orange gingham check pattern, and one nail features a 3D flower and a small green heart charm. The overall effect is more autumn harvest festival than haunted house.
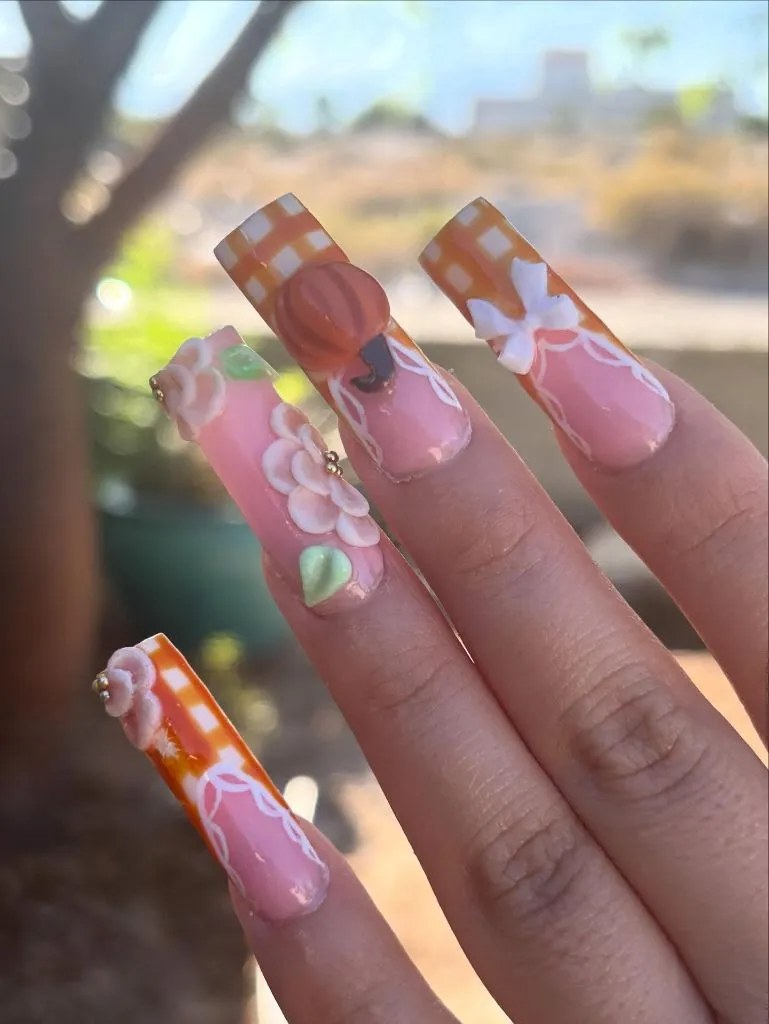
The gingham tips are the anchor pattern here, appearing on enough nails to establish the aesthetic before the pumpkin character and floral details layer additional personality on top. By rendering the pumpkin in pink and peach rather than traditional orange, the design avoids the literal Halloween association and instead occupies a space between seasonal celebration and personal style. The 3D flowers add craft-fair charm that complements the gingham perfectly. This approach shares DNA with fall accent nail designs 2026 in how it balances statement nails with patterned supports.
For the gingham tips, use tape to create clean straight lines at the smile line, then paint alternating stripes in orange and white, overlapping to create the characteristic checkered effect. The 3D flowers should be piped in white or pale pink gel and kept small — no larger than a pencil eraser. Avoid adding both 3D elements and detailed painting on the same nail; this set works because each nail commits to one technique.
16. Pumpkin French Tips With Gradient Orange on Nude Almond Nails
Simplicity at its most effective. This set uses a nude base across all nails, with two featuring pumpkins painted as French tip replacements — the pumpkin shape emerging from the base at the tip, outlined with thin black stem and vine details. The remaining nails alternate between a transparent red-orange tip and a solid shimmery orange on the pinky. There are no ghosts, no spiders, no webs — just pumpkins, cleanly rendered.
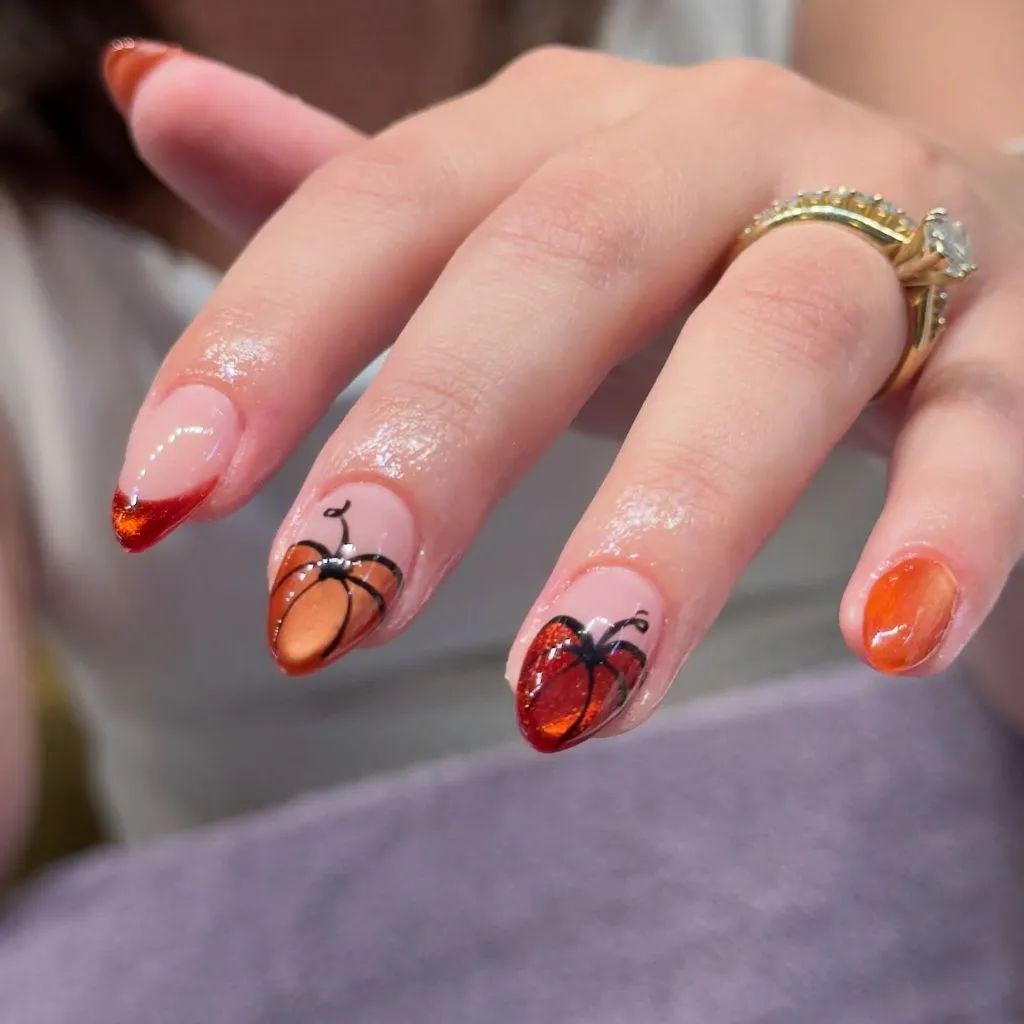
The pumpkin-as-French-tip concept is clever because it uses existing nail art grammar — the French manicure tip — and replaces it with a character shape. Your brain reads the pumpkin as both a seasonal motif and a structural element, which is why this design feels polished rather than novelty. The gradient orange tip on the ring finger references the pumpkin color without illustration, providing visual continuity. This is the ideal entry point for someone who wants Halloween pumpkin nail characters 2026 energy without committing to full character work across every nail.
Paint the pumpkin by starting at the nail tip and working backward, creating rounded segments with a thin brush. The vine and stem should be the last details added, in black, extending just past the pumpkin shape toward the cuticle to give the illusion of growth. Use a jelly or transparent orange for the accent tips rather than an opaque shade; the translucency keeps the design airy and prevents it from competing with the hand-painted pumpkins.
17. Black Pumpkin Parade on Extra-Long Coffin Nails With Glitter Spiderweb Encapsulation
Maximum drama. These extra-long coffin nails alternate between two designs: black bases covered in hand-painted jack-o’-lantern faces with spiderwebs, and amber-brown jelly bases with gold spiderweb encapsulation and chunky orange glitter suspended inside the acrylic. The jack-o’-lanterns are painted in yellow-gold with menacing expressions — angular eyes, jagged grins — and repeated in different sizes across the black nails.
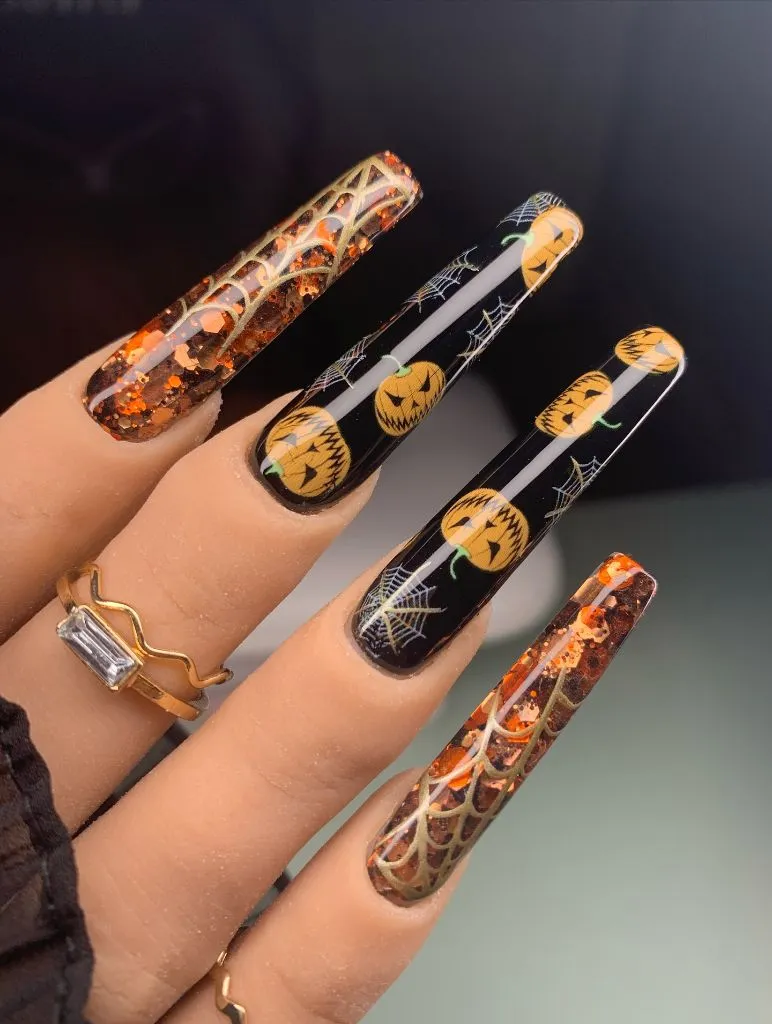
The encapsulated glitter nails are doing something technically impressive — the spiderweb pattern appears to float within the nail itself, with glitter chunks captured at different depths, creating a three-dimensional effect that catches light differently depending on the angle. Against these complex texture nails, the flat painted pumpkins on black read as bold graphic elements rather than detailed illustration. The contrast between the two nail types — one organic and deep, the other flat and graphic — creates rhythm across the hand.
Encapsulation requires building the nail in layers: apply the first layer of gel or acrylic, place the spiderweb design and glitter, then encase everything under a clear top layer. The pumpkin faces should be painted with a fine brush using golden-yellow paint, and the expressions should vary slightly between nails to avoid mechanical repetition. Avoid these on short nails; the encapsulation effect needs length to develop properly, and the pumpkin parade needs surface area for multiple faces.
18. Witch Potion Bottle and Spider With Green-and-Nude Color Block
These square-shaped short nails each feature a different Halloween character against a nude base, but each character incorporates a different bold color. The index finger shows a green witch hat, the middle has a red-orange bow or butterfly, the ring finger carries a blue-purple spider with a shimmery body, and the pinky features a black spiderweb on a black base. A bright green witch silhouette with a potion bottle anchors the set.
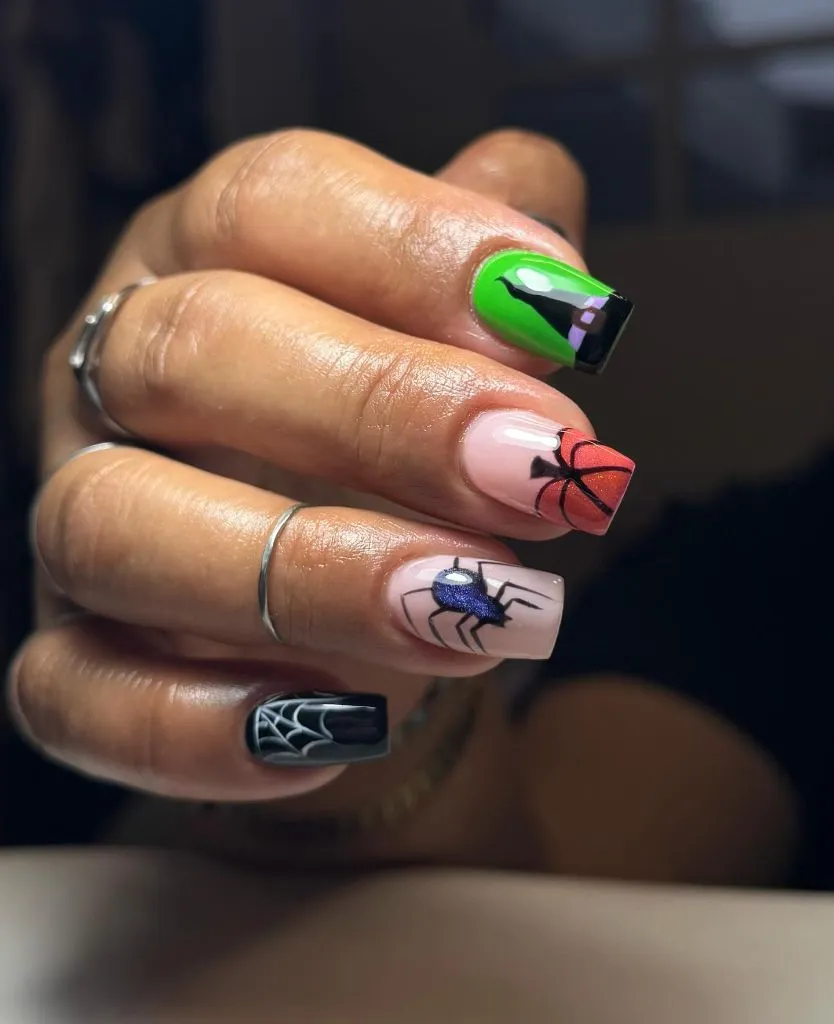
Using a different color for each character against the same nude base transforms the set into something that looks like a page from a Halloween coloring book — each image is distinct, but the shared background and illustration scale hold them together. The green is the most unexpected choice and therefore the most memorable; it shifts the Halloween palette away from the expected orange-and-black into something more witchy and apothecary-adjacent. The blue spider with its shimmer finish adds a touch of glamour that prevents the set from feeling purely illustrative.
Paint each character using a two-step process: lay down the colored shape first in the bold hue, cure, then add black outline details on top. The nude base should be a warm beige rather than a cool pink to complement the green and orange tones. Avoid adding too many background details around the characters; the clean nude space between and around each motif is what gives the set its graphic clarity.
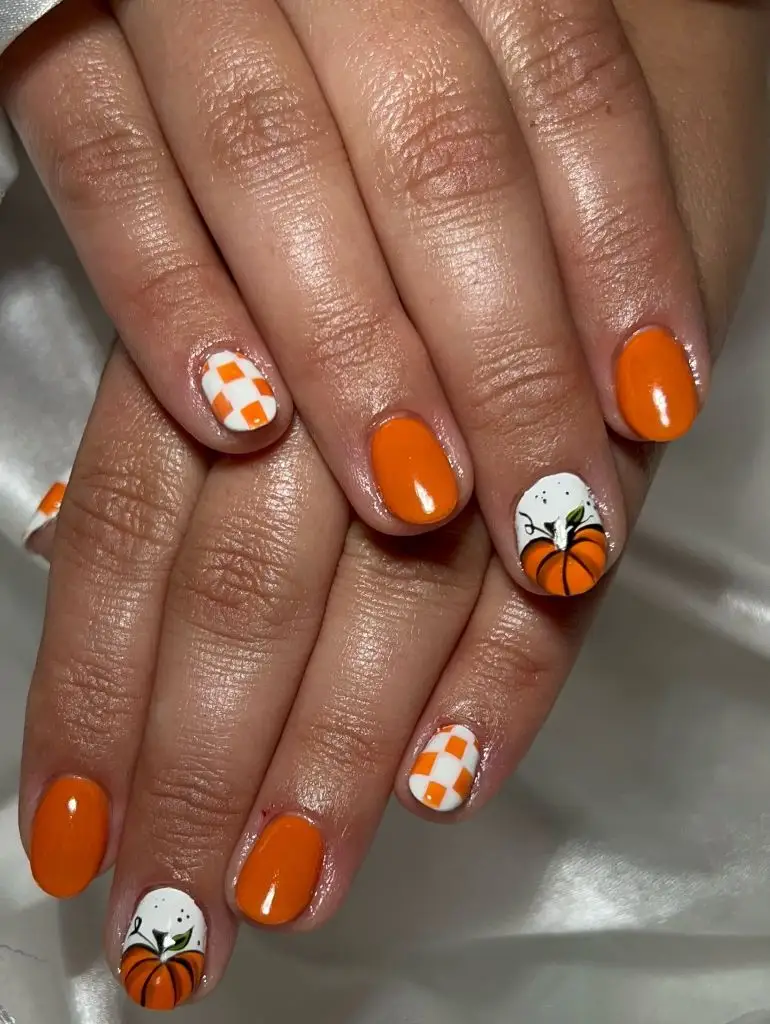
19. Orange Pumpkin Checkerboard With Solid Orange on Short Round Nails
Sometimes the most wearable Halloween design is also the simplest. This short, round-nailed set alternates between solid glossy orange nails and white nails with orange checkerboard patterns, plus two accent nails featuring small, neatly painted pumpkins on white. The pumpkins have green leaf details and are positioned at the lower half of the nail, looking almost like they’re sitting on a shelf.
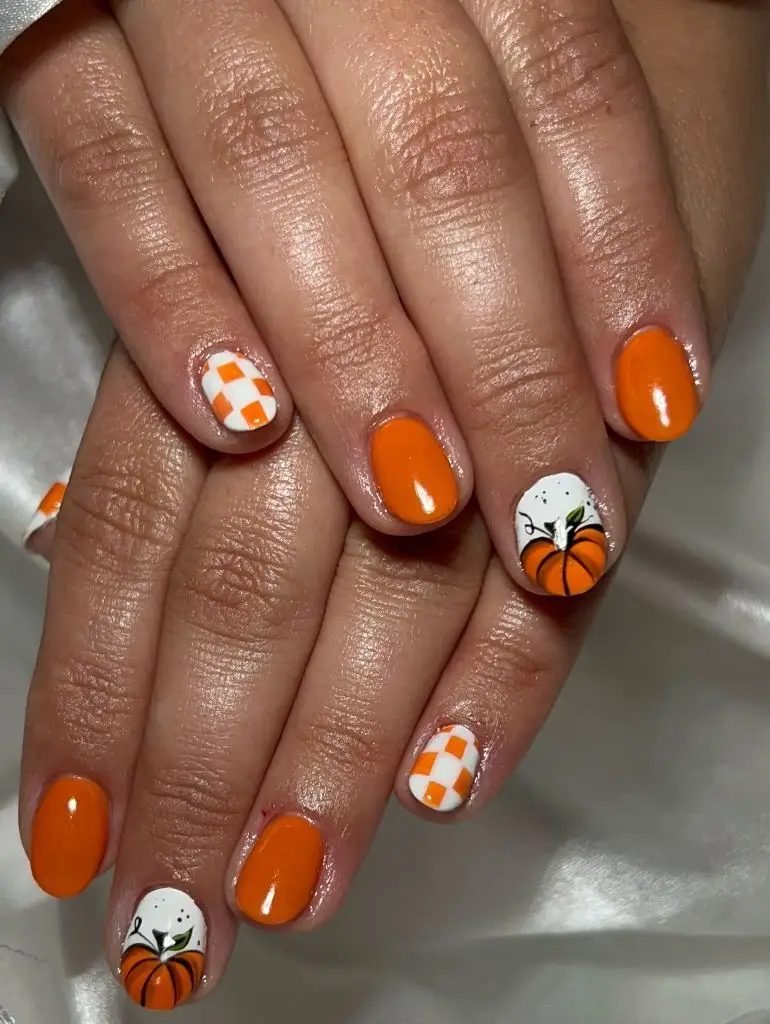
The checkerboard pattern connects the solid orange nails to the character nails by using the same orange tone across all three design types. This means nothing feels random or disconnected — the pumpkin, the checks, and the solid all speak the same color language at different levels of complexity. The short, round nail shape keeps everything feeling approachable and everyday-wearable rather than costume-like. This pairs naturally with fall manicure colors 2026 if you want to extend the solid orange to a full autumn rotation.
For the checkerboard, use tape or a grid tool to ensure even squares — uneven checks look sloppy rather than charming at this small scale. Paint the pumpkins with the stem slightly off-center for a more natural, less clipart-like appearance. Avoid going darker than a true medium orange for this set; the cheerful brightness is part of its appeal, and darkening the orange toward rust would change the mood entirely.
20. Pumpkin Cherry Pair With Black Daisy and Double French Tip
This inventive set features jack-o’-lantern faces painted as cherry pairs — two small pumpkins connected by green stems, positioned like the classic cherry motif but with carved faces grinning from each one. Other nails carry black-and-orange double French tips and one features a nude base covered in small black daisy flowers. The combination of the cherry-pumpkin hybrid character and the floral pattern creates something that feels like Halloween meets mod fashion.
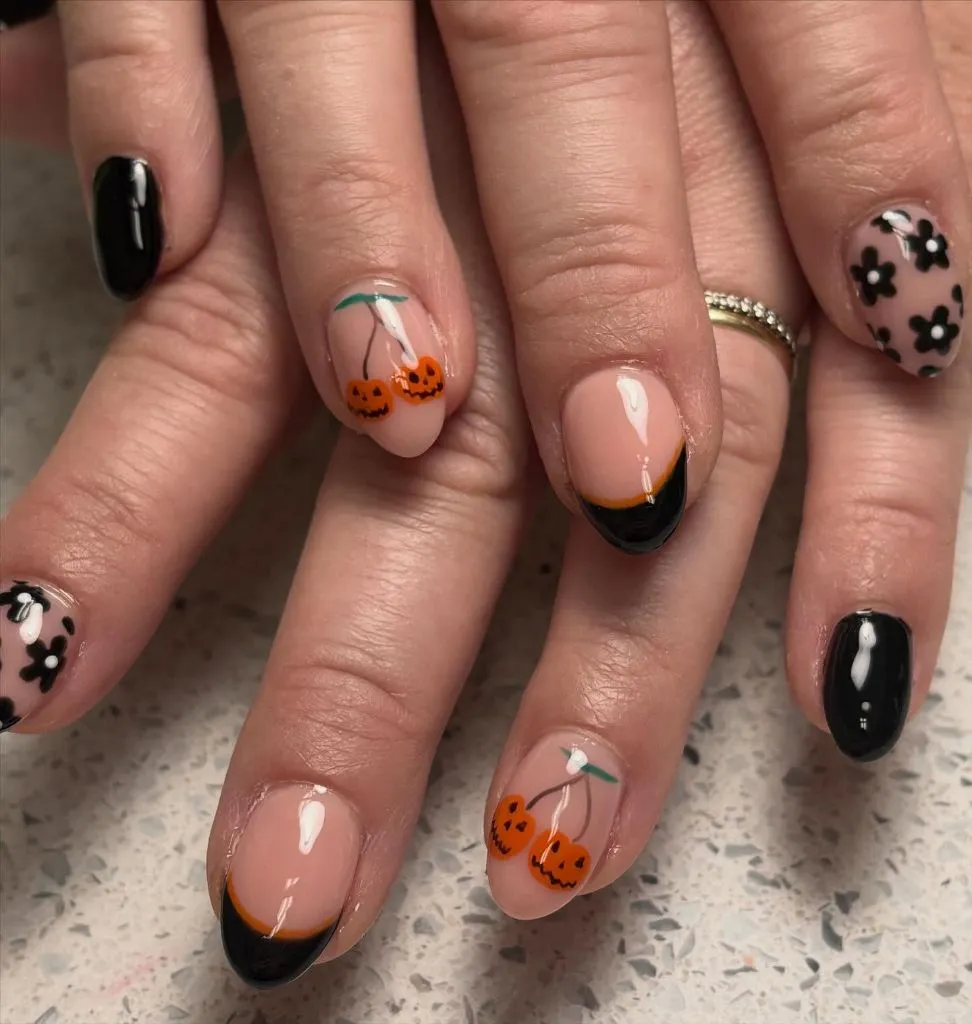
The cherry-pumpkin hybrid is the single best idea in this set — it takes a year-round nail art motif and makes it seasonal through character modification rather than color change. Someone unfamiliar with the cherry nail art trend would see cute pumpkins; someone who knows the trend sees the clever reference. That layered readability is what makes nail art feel designed rather than decorated. The black daisies on the accent nail pull in a completely different aesthetic — almost 60s mod — but the black-and-orange palette keeps everything in the same tonal family.
To paint the cherry-pumpkins, start with two small orange circles positioned close together, add the carved face details in black, then paint the green stems connecting them at the top and curving upward. The double French tip is achieved by painting a thin orange line above a thicker black tip, leaving a sliver of nude visible between them. Avoid making the pumpkin-cherries too large; the charm depends on them being delicate and recognizably cherry-shaped from a distance.
21. Olive Green Witch’s Brew With Skull, Ghost, and Pumpkin Insets
An unconventional color choice anchors this set — olive green, applied across all nails as the dominant shade, with gold glitter accents and small character vignettes inset into oval windows on each nail. One window shows a tiny white ghost, another reveals an orange pumpkin, and a third contains a white skull with black eye sockets. The gold detailing around each window creates the impression of looking through enchanted mirrors or potion bottle labels.
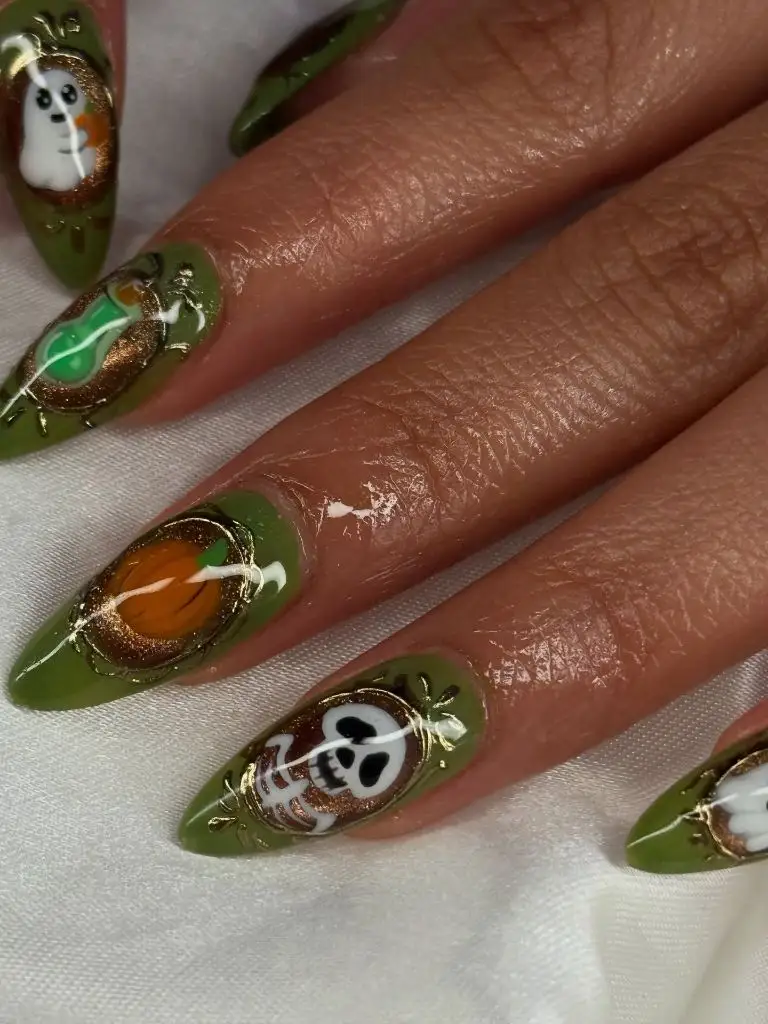
The olive green is the decision that makes this set memorable — it avoids every expected Halloween color and instead references moss, potions, and forest witchcraft. The gold glitter scattered across the green surfaces and concentrated around the character windows adds an antique, almost medieval quality. Each character is tiny, no larger than a grain of rice, which forces the viewer to look closely and creates an intimate, secretive quality that suits the witchy theme perfectly.
Mix the olive green from a green base with a small amount of brown to avoid a shade that’s too bright or too military. The character insets work best when you first paint a small oval in a contrasting color — gold for the frame, then the background color inside — and add the character last in the smallest possible scale. Avoid using a glossy top coat; a satin or semi-matte finish better suits the earthy, apothecary mood and prevents the gold glitter from looking too festive. For another approach to unexpected fall dip nails 2026 color choices, the olive family offers rich possibilities.
22. Spooky Pumpkin Jack With Stars and Orange-to-Nude Gradient on Medium Almond Nails
This balanced set captures the essence of Halloween pumpkin nail characters 2026 in its most wearable form. Medium-length almond nails feature a clean orange-to-nude gradient on most fingers, with two accent nails carrying black star silhouettes and delicate sparkle details. The ring finger features a small, perfectly rendered jack-o’-lantern with a classic triangular nose and gap-toothed grin, painted in glowing orange against a dark background. The overall impression is warm, seasonal, and effortlessly pulled together.
The gradient nails establish an autumnal backdrop that makes the single character nail feel like a deliberate focal point rather than a random addition. The black stars on the accent nails create a nighttime atmosphere that contextualizes the jack-o’-lantern without adding another character — they’re setting, not cast. This one-character approach is the most universally flattering way to incorporate Halloween personality into a manicure, and the medium almond shape keeps the proportions elegant and modern.
Achieve the gradient using a sponge with sheer orange and nude polish, blending in the middle third of the nail. Paint the jack-o’-lantern face with clean geometric shapes — triangles for the eyes and nose, a zigzag line for the mouth — using a fine-tip brush in bright orange over a cured black or dark brown base. Avoid softening the jack-o’-lantern’s expression; the graphic simplicity of classic carved pumpkin faces reads more clearly at nail scale than realistic or cute interpretations.

Hi, I’m Zoey Mitchell, the creator of ChicStyle Blog.
I share simple, wearable outfit ideas, hairstyles, nail trends, and beauty tips that feel natural and easy to recreate.
This blog is where I explore everything that makes a woman feel put together and confident every day. I’m not an expert — just a woman who genuinely loves style, mixing looks, and discovering what works.
If you love effortless fashion with a personal touch, you’ll feel at home here.