
Sometimes the most memorable manicure isn’t the one with the most elaborate technique — it’s the one where a single repeated shape creates its own quiet rhythm across ten fingers. Polka dot nails have that kind of persuasive simplicity: a pattern so familiar it risks feeling juvenile, yet when the color balance is deliberate and the placement is considered, dots become graphic, modern, and surprisingly versatile. The appeal is that each circle is a tiny design decision — its size, its spacing, its color against the base — and those decisions compound into a look that reads as intentional from across a room.
The guiding principle here is to choose one anchor element and let everything else serve it. That anchor might be a single bold base color, a specific dot size, or even the negative space between circles. Once you commit to that one thing, the rest of the design falls into place naturally. Restraint in one area gives you freedom in another, and that tension is what makes the best dot-based manicures feel designed rather than decorated.
1. Burgundy and Baby Blue Floral Dot Mix
This set splits its personality across five nails and makes it work. The thumb carries a pale blue base scattered with small burgundy dots, while the index finger layers burgundy floral shapes over a sheer pink base with a curved blue French tip along the bottom edge. The middle nail commits fully to a deep burgundy covered in raised white dots, the ring finger floats a single blue daisy with a burgundy center over bare pink, and the pinky mirrors the thumb’s palette in reverse — pale blue with burgundy dots. The reason this works is the strict two-color rule: every element draws from the same burgundy-and-blue well, so the variety in pattern never becomes chaos.
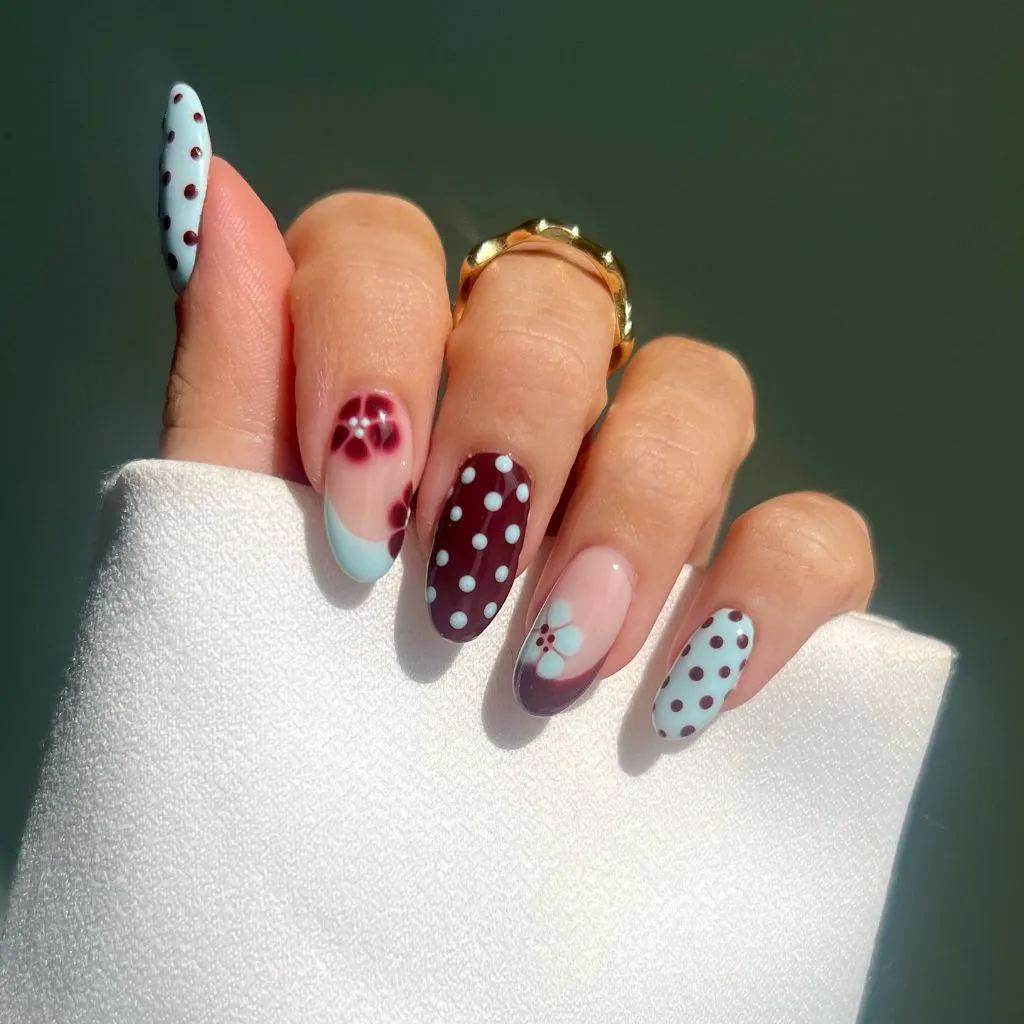
The balance here comes from distributing visual weight evenly. The fully saturated burgundy middle nail acts as an anchor, flanked by lighter, more delicate designs on either side. If every nail were as bold as the middle finger, the hand would feel heavy; if every nail were as subtle as the ring finger’s single flower, it would feel unfinished. That graduated intensity — light, medium, full, medium, light — is the principle that holds the set together.
To recreate this, start by mixing your two hero colors with a sheer or nude base, giving yourself three tones to rotate through. Use a dotting tool in two sizes — smaller for scattered polka dots, larger for flower petals. The trap to avoid is introducing a third strong color; the reason this set feels cohesive despite five different designs is that the palette never wanders beyond its original pair.
2. Warm Cream and Burgundy Polka Dot Medley
Both hands here tell the same story in slightly different arrangements: some nails wear a full cream base peppered with dark burgundy dots, others reverse it with burgundy under white dots, and a few feature delicate floral shapes in either color family against bare pink. The watermark on the image tells you this came from a professional nail lounge, and the execution confirms it — every dot is evenly spaced, every flower petal tapers to the same thickness. What makes one specific detail stand out is the way the polka-dot French tips on several nails use a curved line to separate the dotted section from the bare nail, adding a structural element that pure allover dots wouldn’t provide.
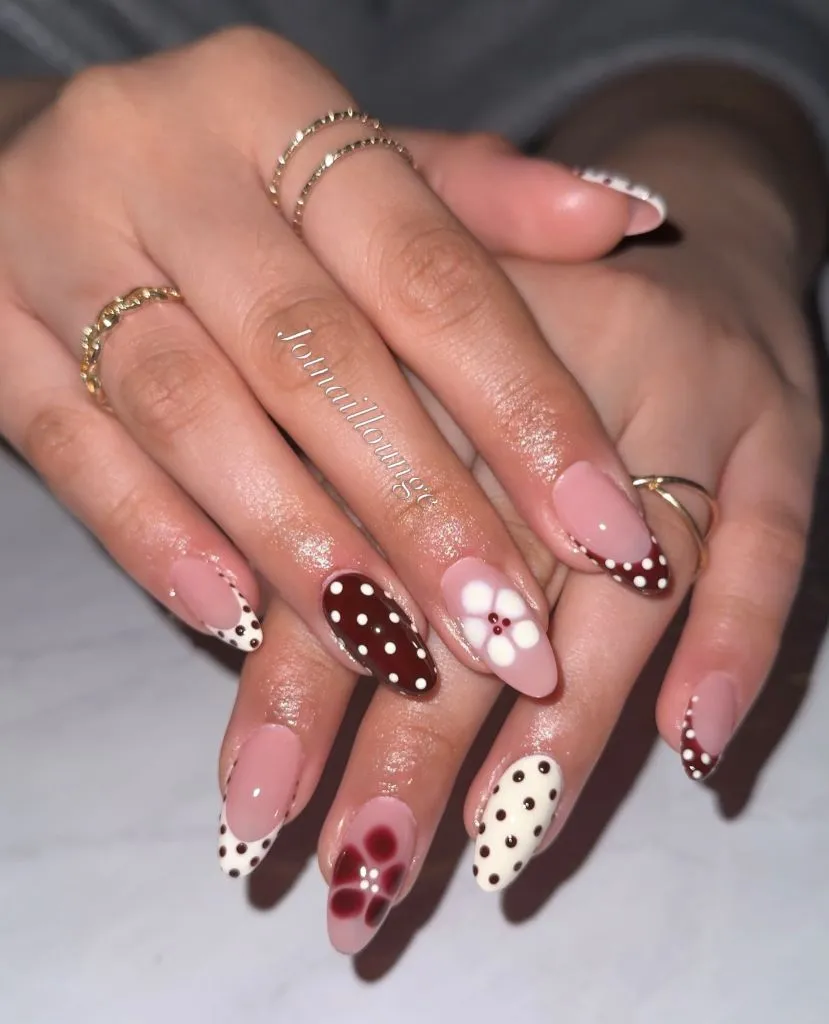
The contrast between the opaque cream dots and the translucent pink base creates a layered depth that a solid base color wouldn’t achieve. You read the dots first, then the base, then the skin tone underneath — three visual layers in a design that’s technically only two colors. That kind of built-in dimension is why sheer or jelly bases work so well with dot patterns.
If you love the warmth of burgundy nails for autumn, this set proves you don’t need to commit to a full dark manicure to get that seasonal richness. Paint half your nails in a nude or sheer pink, then add burgundy dots using a medium-sized tool. For the accent nails, reverse the values. Avoid making the dots too large — the elegance here depends on the dots reading as a fabric-like print rather than cartoon circles. For more ideas on working burgundy into your fall rotation, explore maroon fall nails for deeper tonal inspiration.
3. Two-Tone Blue Contrast Dots
One hand wears light sky blue with small navy dots; the other wears deep navy with white dots. That’s it. No flowers, no French tips, no accent nails — just a single polka dot pattern executed in two tonal directions, one per hand. The simplicity is the entire point, and it lands because the two blues are far enough apart on the value scale to read as distinct color stories rather than a muddled middle ground. The almond nail shape keeps the look contemporary and stops the playful dot pattern from veering too youthful.
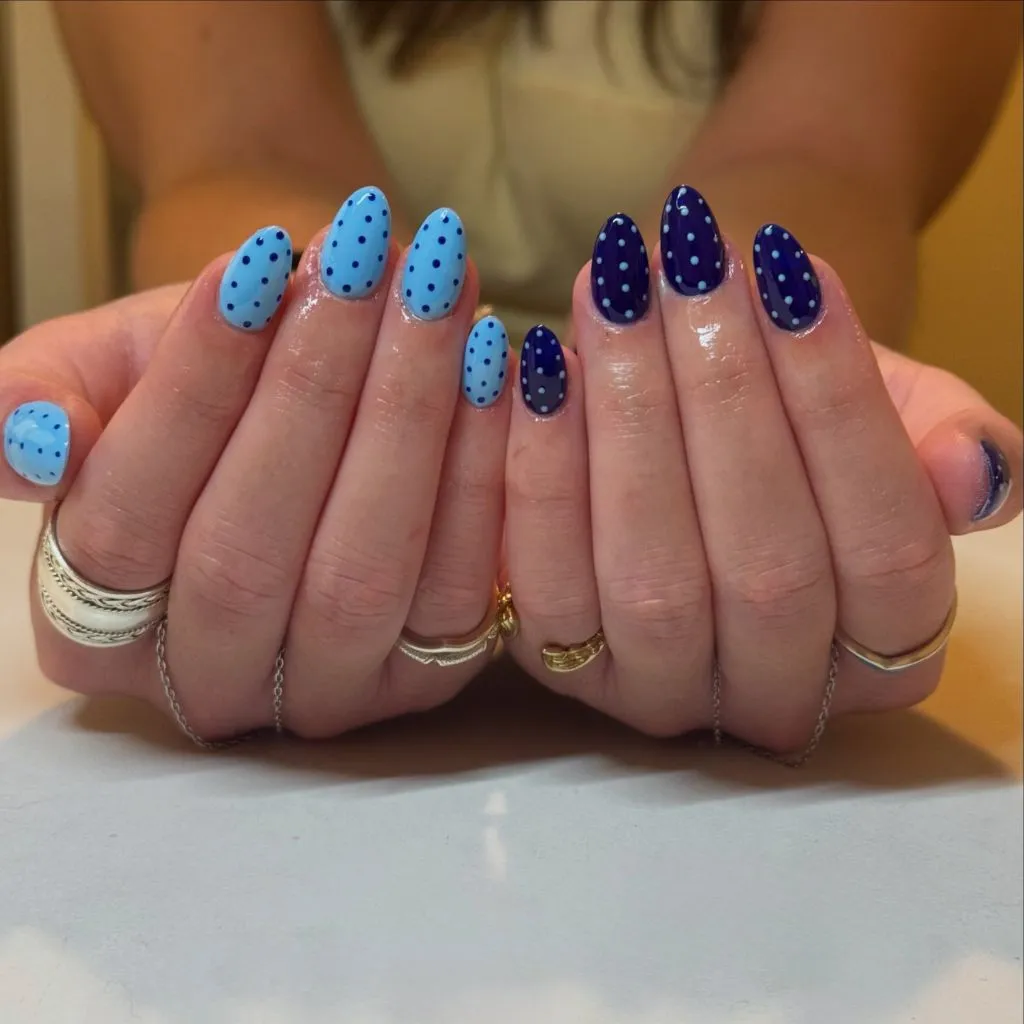
What’s instructive here is the dot sizing. The navy dots on the blue base and the white dots on the navy base are roughly the same diameter, which creates visual consistency even though the palettes are inverted. If the dots on one hand were noticeably larger than on the other, your eye would read the two hands as mismatched rather than coordinated. Symmetry in dot scale bridges asymmetry in color.
This is one of the most beginner-friendly polka dot nail designs you can attempt at home. Choose two shades of the same color family with strong contrast between them, paint five nails in each, then dot the opposite shade on top. The key detail to get right is spacing — aim for roughly a dot-width of space between each circle so the base color has room to breathe. Crowding the dots together turns a pattern into texture, which is a different look entirely.
4. Sheer Pink with White Swiss Dots
Every nail here wears the same design: a soft, slightly milky pink base with small white dots scattered in an even grid. The effect is quiet and textile-like, reminiscent of Swiss dot fabric on a summer blouse. There’s no accent nail, no color variation, no asymmetry — and that uniformity is what gives this set its particular sophistication. The dots are small enough that from a few feet away, the nails simply look like they have an interesting texture rather than an overt pattern.
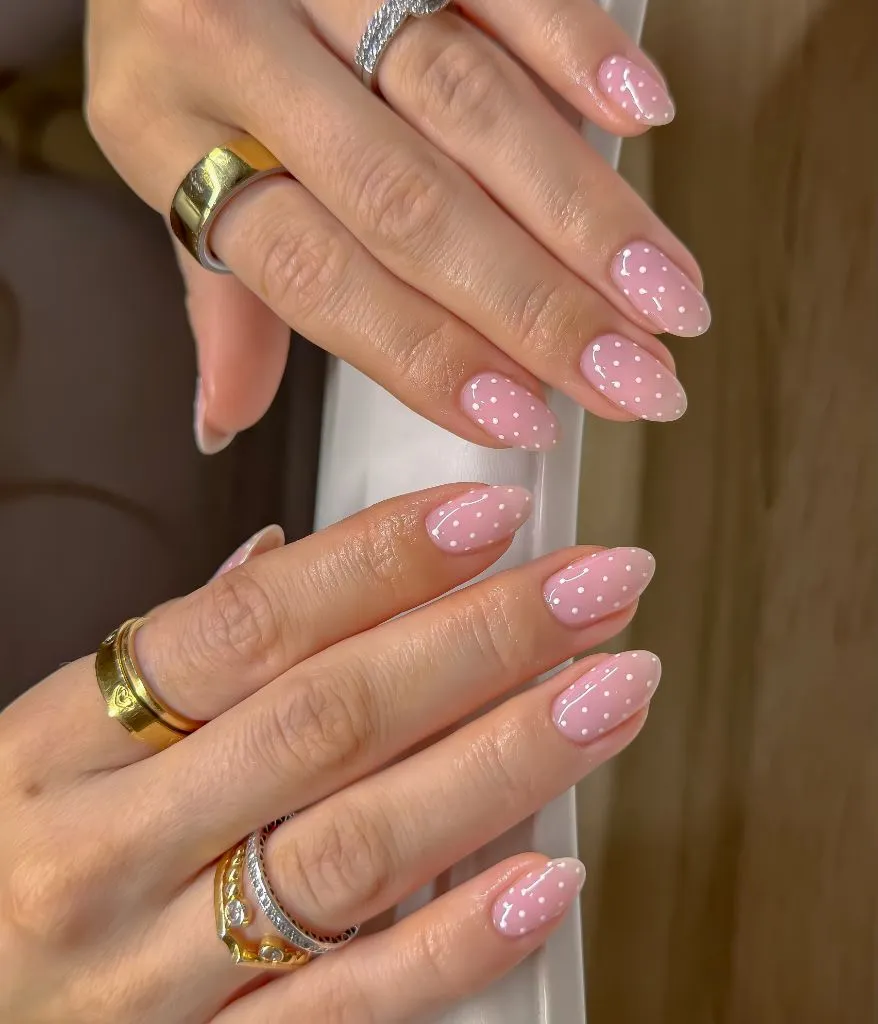
The subtlety works because the value contrast between the pink base and the white dots is low. Neither color is fighting for attention; they coexist at the same gentle volume. This is the opposite strategy from the blue contrast set above, and it’s equally valid — where that one relied on bold difference, this one relies on a whisper. The gold rings styled alongside add warmth without competing.
To recreate this, use a sheer builder gel or a jelly pink polish as your base, building it up to just one or two coats so the nail bed shows through slightly. Then use a fine dotting tool dipped in white to place dots in a loose grid. The mistake to avoid is using an opaque pink base — you lose the translucent quality that makes the whole look feel like fabric rather than paint. This approach also pairs beautifully with nude fall nails if you want a seasonal twist on the same quiet strategy.
5. Chocolate Brown French Tips with White Polka Dots
A natural pink base is left mostly bare, with chocolate brown covering the tips in a slightly exaggerated French shape. White dots and a thin white outline border decorate the brown sections, while the exposed pink base stays completely clean. The specific detail that elevates this beyond a standard French tip is the white outline that traces the wavy edge where brown meets pink — it turns a casual color block into a deliberate design element with a finished, almost cartoonish charm.
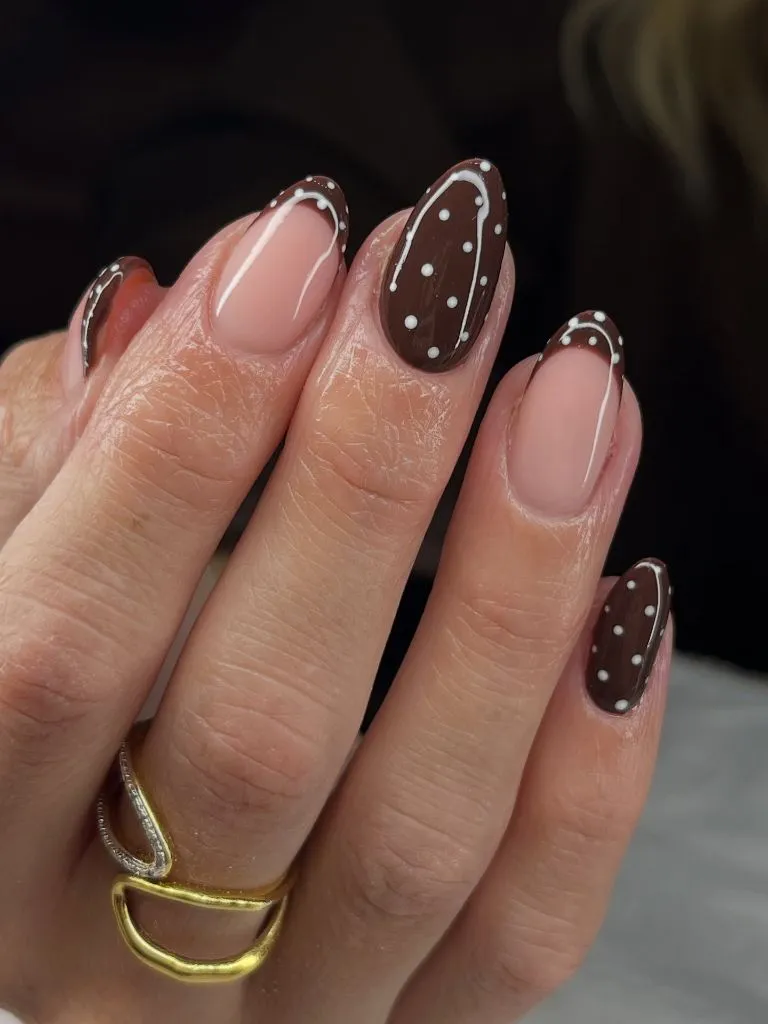
The proportion matters: the brown tip sections take up roughly 40 to 50 percent of each nail, which is bolder than a classic French but doesn’t overwhelm the natural base. That ratio keeps the design grounded. If the brown extended any further toward the cuticle, the dots would feel cluttered; if it were a thin sliver, the dots wouldn’t have enough canvas to register as a pattern.
When recreating this, paint your French tips freehand with a medium-width brush and don’t worry about making the curve perfectly symmetrical — the slightly organic, wavy edge is part of the aesthetic. Add the white outline first with a thin liner brush, then fill in dots while the brown is fully cured. The white outline is the non-negotiable detail; without it, the design loses the graphic quality that makes it special.
6. Silver Chrome Polka Dots on Stiletto Nails
These stiletto-shaped nails wear a metallic silver chrome finish as their base, covered entirely in small, evenly spaced black dots. The chrome reflects light at different angles across the curved nail surface, which means the dots appear to shift in value — darker against bright reflections, nearly invisible in shadowed areas. That interplay between the static dot pattern and the dynamic reflective base is what makes this set compelling. The long stiletto shape amplifies the effect by providing more surface area for the eye to travel across.
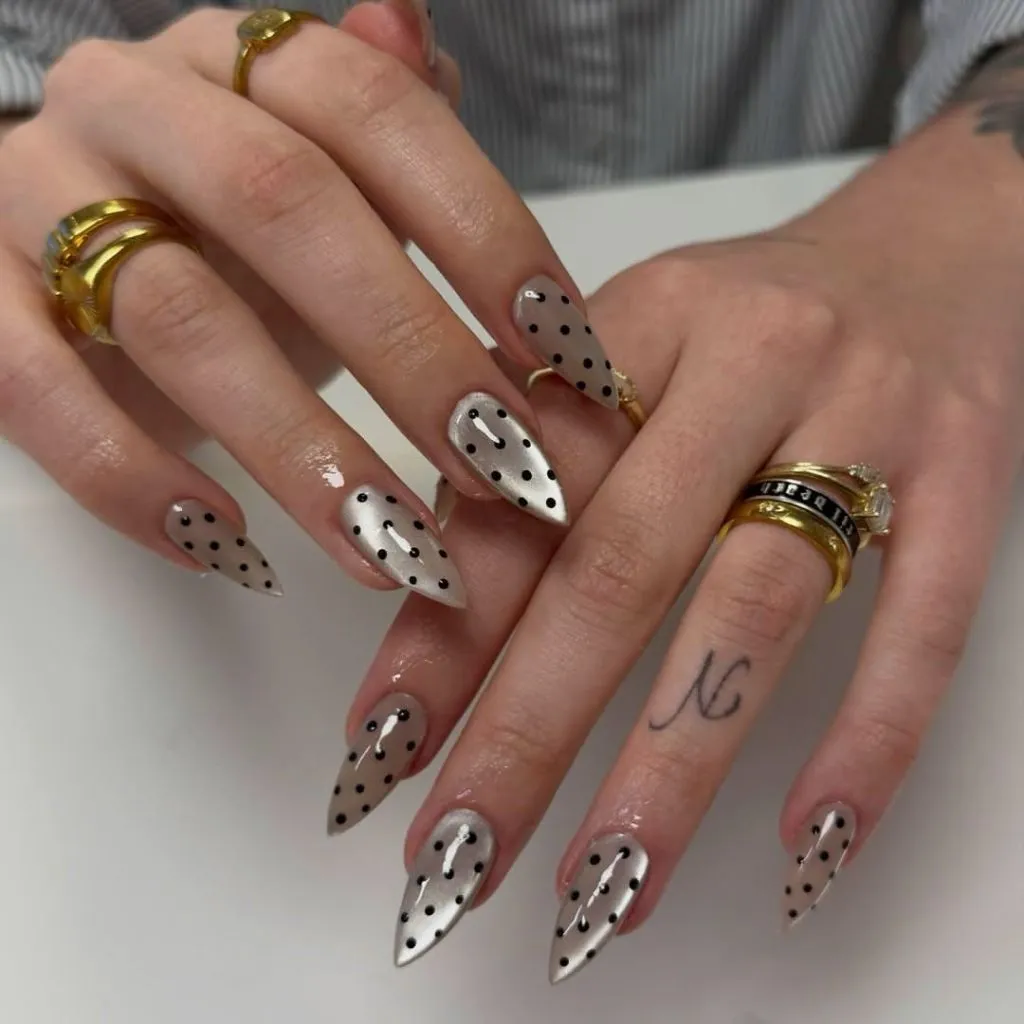
Chrome and dots shouldn’t work together in theory — one is futuristic, the other is retro — but the tension between those two aesthetics is exactly the point. The gold chunky rings styled on multiple fingers lean into the maximalist direction, signaling that this is a deliberate clash rather than an accident. The small finger tattoo adds another layer of personality without disrupting the visual story.
If you want to try this, apply a chrome powder or mirror-effect gel as your base and cure it completely before adding dots. Use a very fine dotting tool with black gel polish, and work in sections so the dots stay consistent. The critical thing to avoid is using a matte top coat — the whole effect depends on the chrome staying reflective under a high-gloss finish. This bold approach also works as a fall accent nail design if you limit the chrome dots to one or two fingers and keep the rest simple.
7. Brown and White Reversible Dot French Tips
Each nail alternates between a brown base with white dots and a white base with brown dots, all applied as generous French tip sections over a bare natural nail. The two hands mirror each other, with the pinky on one hand matching the index on the other, creating a balanced distribution of the two colorways. The design principle at work is reversibility — by swapping the dot-and-base relationship across nails, the set avoids the monotony of a single repeated pattern while staying tightly coordinated.
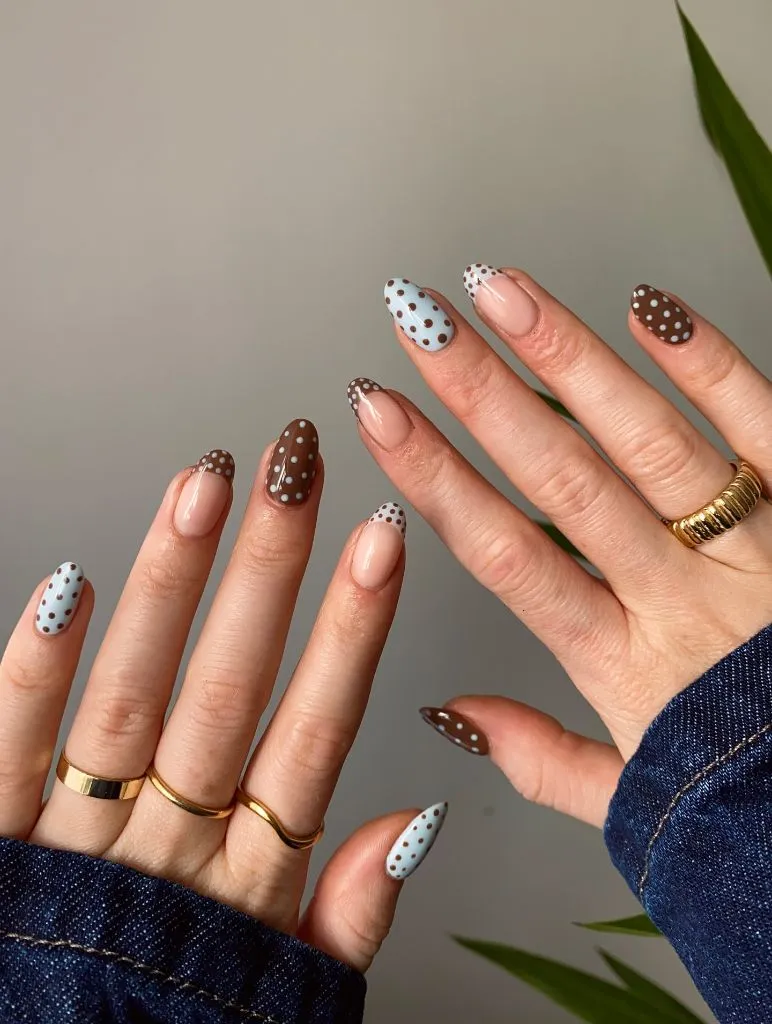
The exposed natural nail between the cuticle and the dotted tip section acts as a visual reset between nails. Without that breathing room, the constant flip-flopping between brown-on-white and white-on-brown could feel dizzying. The nude gap provides a neutral interval that lets your eye appreciate each nail individually before seeing the pattern across the full set.
This is a strong option for fall medium length nails because the tip design works best with enough nail length to clearly show both the bare section and the dotted section. Paint your tip shapes first in either brown or white, cure, then dot the contrasting color on top. Keep your dots at a consistent medium size — too small and the reversibility trick becomes hard to see; too large and you won’t fit enough dots to read as a pattern.
8. Cherry and Red Polka Dot Retro Set
Pink-tipped almond nails carry a rotation of hand-painted cherries and red polka dots across a sheer pink base. The cherries are rendered with glossy red spheres, green stems, and tiny white highlights that give them a three-dimensional quality. Some nails commit to allover red dots on the pink base, while others feature a single cherry pair as the focal point. The retro diner energy is unmistakable, but the sheer pink base and almond shape keep it from tipping into costume territory.
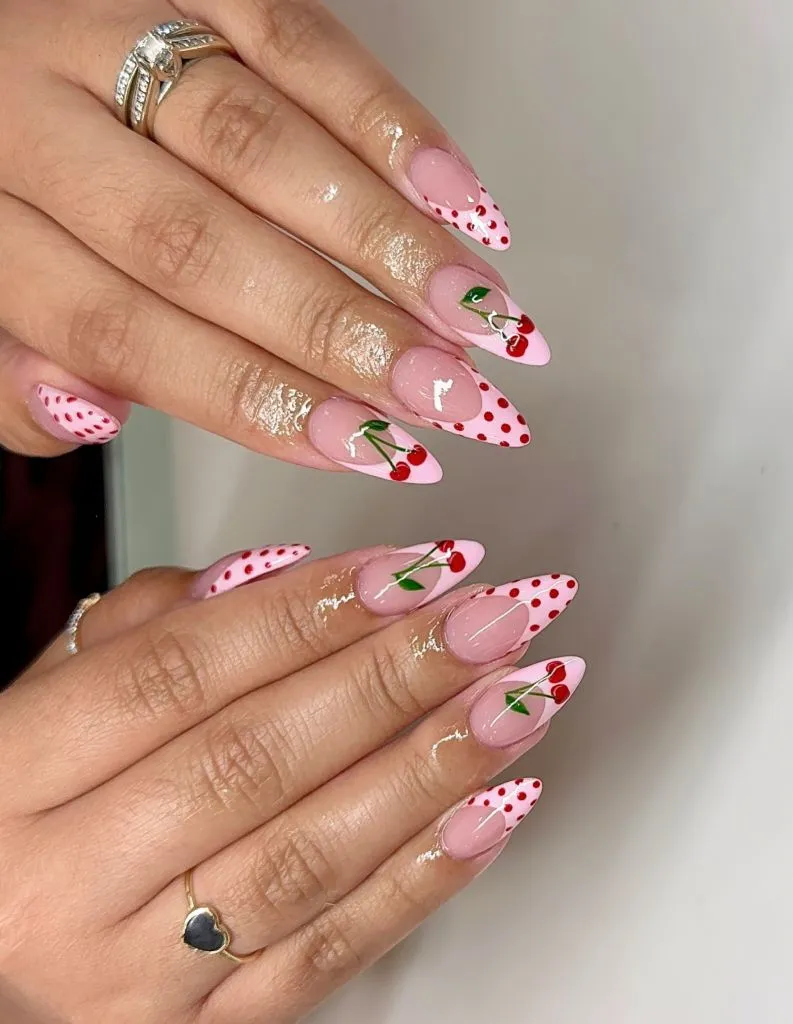
What prevents this from looking like a novelty design is the consistency of the red. The cherry bodies, the polka dots, and the subtle pink tint of the base all live in the same red family, which creates cohesion even though the motifs are different. If the cherries were a different red than the dots, the whole set would fracture into competing elements.
For this one, paint the cherry accents first on designated nails using a thin detail brush, building up the red in two coats for opacity. On the remaining nails, use a small dotting tool for evenly distributed red dots. The detail that makes the cherries convincing is the white highlight dot on each sphere — skip it and they look flat; add it and they immediately read as round, juicy fruit.
9. Deep Red Glazed Dots
All ten nails wear a rich, slightly translucent cherry red with a glazed, glass-like finish, each marked with a few randomly placed small white dots. The dots are sparse — only four or five per nail — which lets the deep red color remain the star. The glazed finish catches light in a way that makes each nail look wet and dimensional, and the white dots sit on top of that shine like tiny pearls. This is polka dot nails reduced to their most elegant minimum.
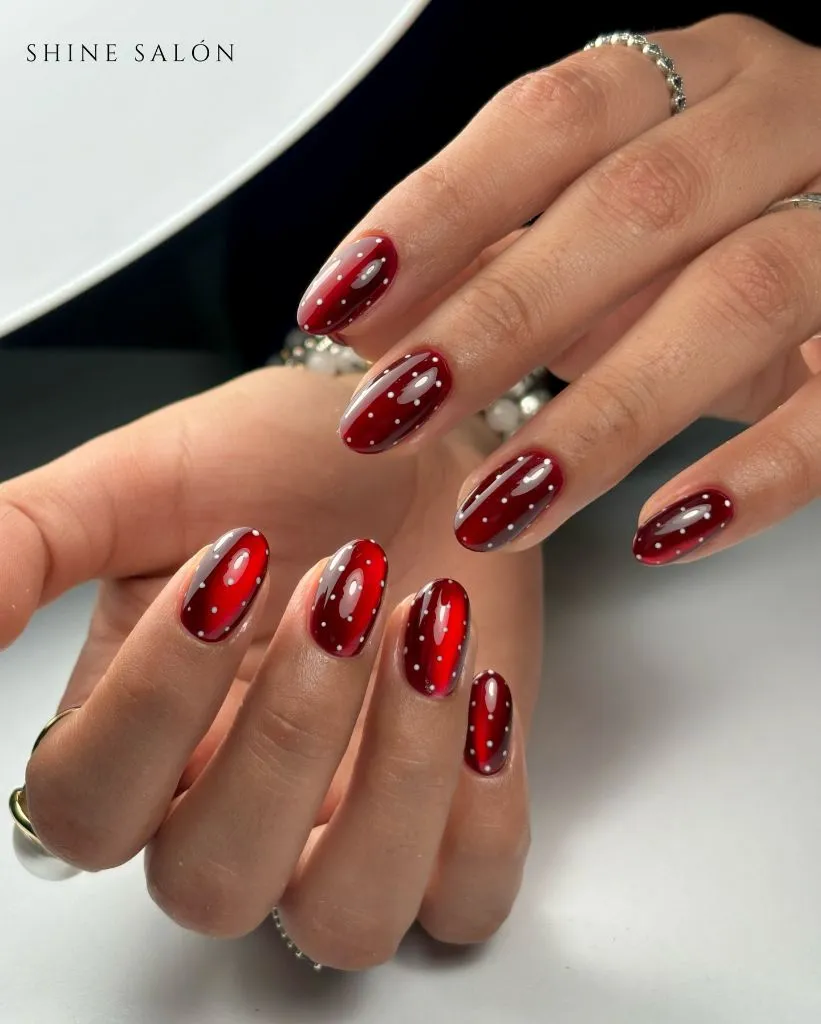
The randomness of the dot placement is actually what makes this set feel high-end rather than homemade. A perfect grid would look mechanical; a perfectly random scatter looks effortless. The key is that the dots are all the same size — randomize placement, not scale. That consistency in diameter is what holds the design together even as the spacing varies.
To achieve the glazed finish, use a jelly or transparent red polish and build up three or four thin coats rather than two thick ones. The translucency between layers creates the depth. Add your white dots after the final color coat but before the top coat so they sink slightly into the surface rather than sitting sharply on top. This technique also translates beautifully to other dark seasonal shades if you’re exploring fall manicure colors.
10. Red and Pink Polka Dot Half-and-Half
This set uses a mix of fully covered nails and half-moon designs, all in deep red with white dots. Some nails are painted entirely in glossy red with scattered white dots, while others leave the lower half of the nail in bare pink with only the upper portion carrying the red-and-white dot pattern. The half-coverage nails create a natural negative space element that keeps the bold red from becoming overwhelming across all ten fingers.
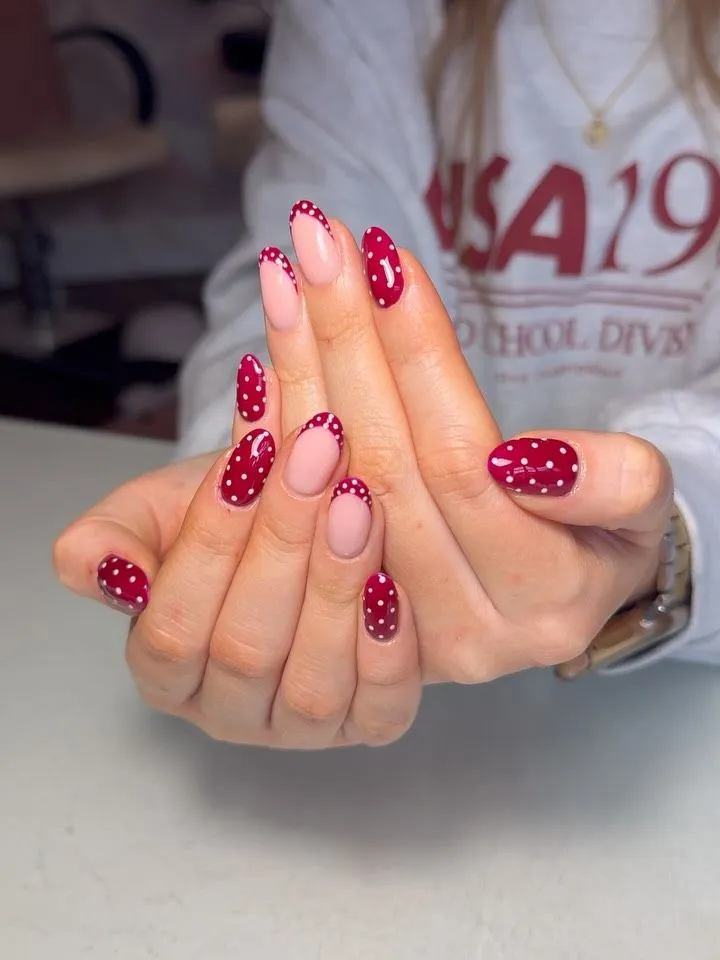
The technique of leaving the lower nail bare introduces a pseudo-French tip effect, but starting from the cuticle end rather than the free edge. This inversion feels fresh because it reverses what your eye expects from a partially painted nail. The exposed pink skin-tone base at the bottom grounds the design in something natural, while the red dots at the top deliver all the personality.
Use a thin brush to paint the curved border between bare nail and red section, following the natural curve of your cuticle line for a clean transition. Fill the upper section with red, cure, then dot white circles across only the painted area. The important detail is keeping dots away from the border line — leave a thin margin of solid red along the edge so the pattern doesn’t blur into the transition.
11. Plum Brown with Cream Dot Accents
Short, rounded nails wear a deep plum-brown polish — the color of dark chocolate with a faint purple undertone — dotted sparingly with small cream-colored circles. The nails are short and natural in shape, and the overall effect is cozy, autumnal, and understated. The plum-brown base does the heavy lifting; the cream dots are quiet enough to almost disappear from a distance, revealing themselves only up close as a textural surprise.
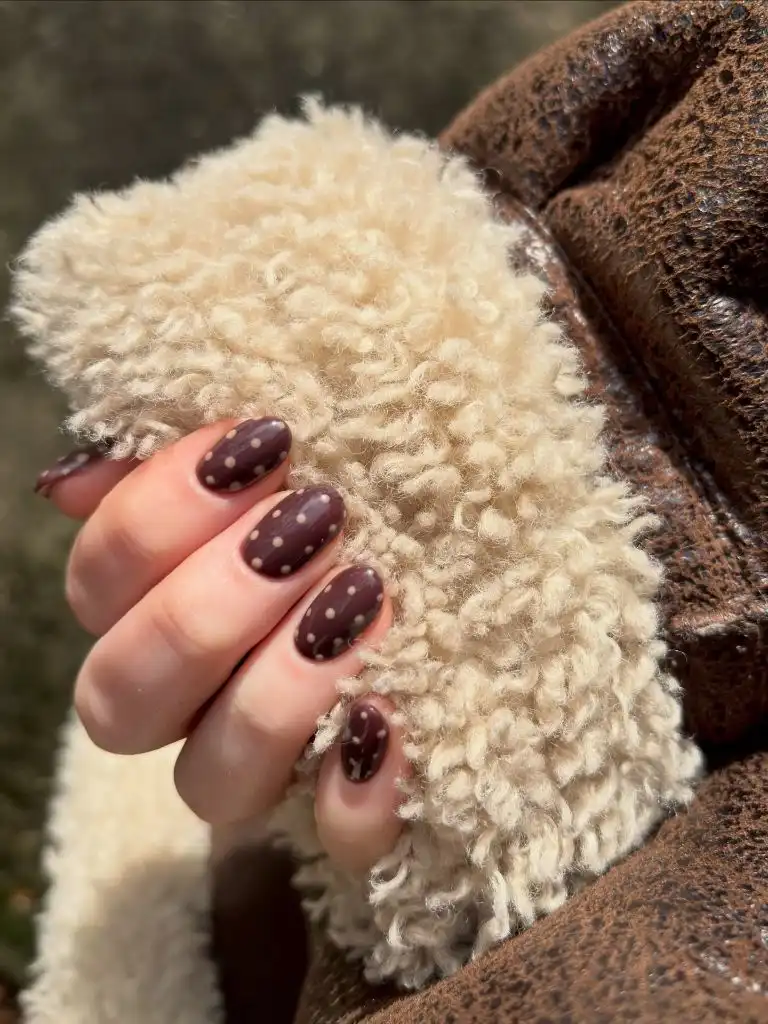
This set proves that polka dot nails don’t require a bold or contrasting color scheme to be effective. The low contrast between plum and cream creates a mood that’s more about warmth than graphic impact. Styled against a shearling-collared jacket, the whole image reads as a fall texture study, with the dots echoing the soft irregularity of the wool.
For short nails, fewer dots per finger is better — three to five is plenty. Place them off-center and at slightly varied intervals for an organic feel. The color match matters here: reach for a cream that has a warm yellow undertone rather than a cool white, which would create too much contrast and fight the cozy mood you’re building. This understated approach works perfectly alongside matte fall nail designs if you want to skip the gloss altogether.
12. Red, Brown, and White Triple Polka Dot Mix
This almond set juggles three colors — deep red, chocolate brown, and crisp white — with each nail wearing a different configuration. One nail is fully red with white dots, another is brown with white dots, a third is white with red dots, and a fourth is white with brown dots. The rotation across all five nails creates a patchwork effect that feels playful but controlled because the palette stays fixed.
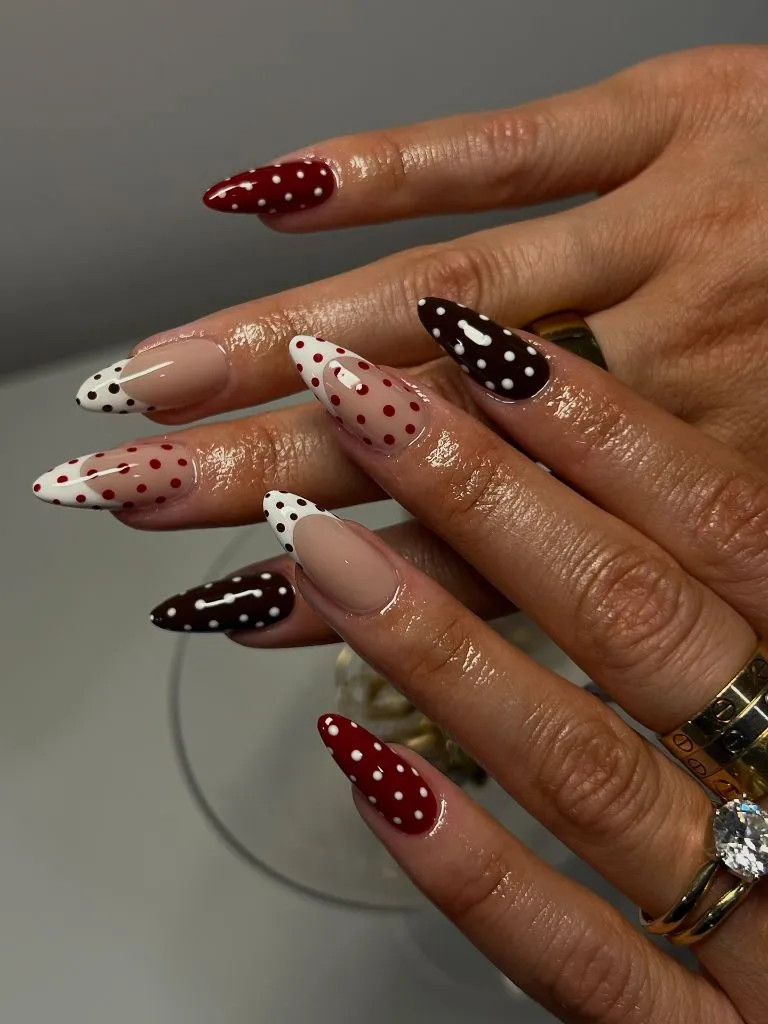
The success of a three-color dot rotation depends entirely on maintaining the same dot size and density across every nail. If the red-on-white nail had large dots while the brown-on-white had tiny ones, the set would feel inconsistent. Here, every dot is roughly the same diameter and spacing, so the eye reads the whole hand as one unified design with internal variety rather than five separate nails.
Start by deciding your three colors and assigning each nail a base-and-dot combination before you begin painting. Write it down if you need to — the planning stage is where this design succeeds or fails. Paint all bases first, cure everything, then come back with your dotting tool and work through each color in sequence. Avoid adding a fourth color or introducing any other motif; the three-color rotation is already visually busy enough.
13. Dalmatian Dot French Tips on Sheer Pink
A nude-pink almond base shows through on most of each nail, with the tips dipped in white and covered in irregularly spaced black dots that echo a Dalmatian print. A few nails add tiny gold or olive-toned floral stamps near the cuticle for a subtle accent. The irregularity of the black dots is the defining characteristic — they’re not perfectly round or evenly placed, which gives the tips an organic, almost paint-splattered quality that feels more fashion than craft.
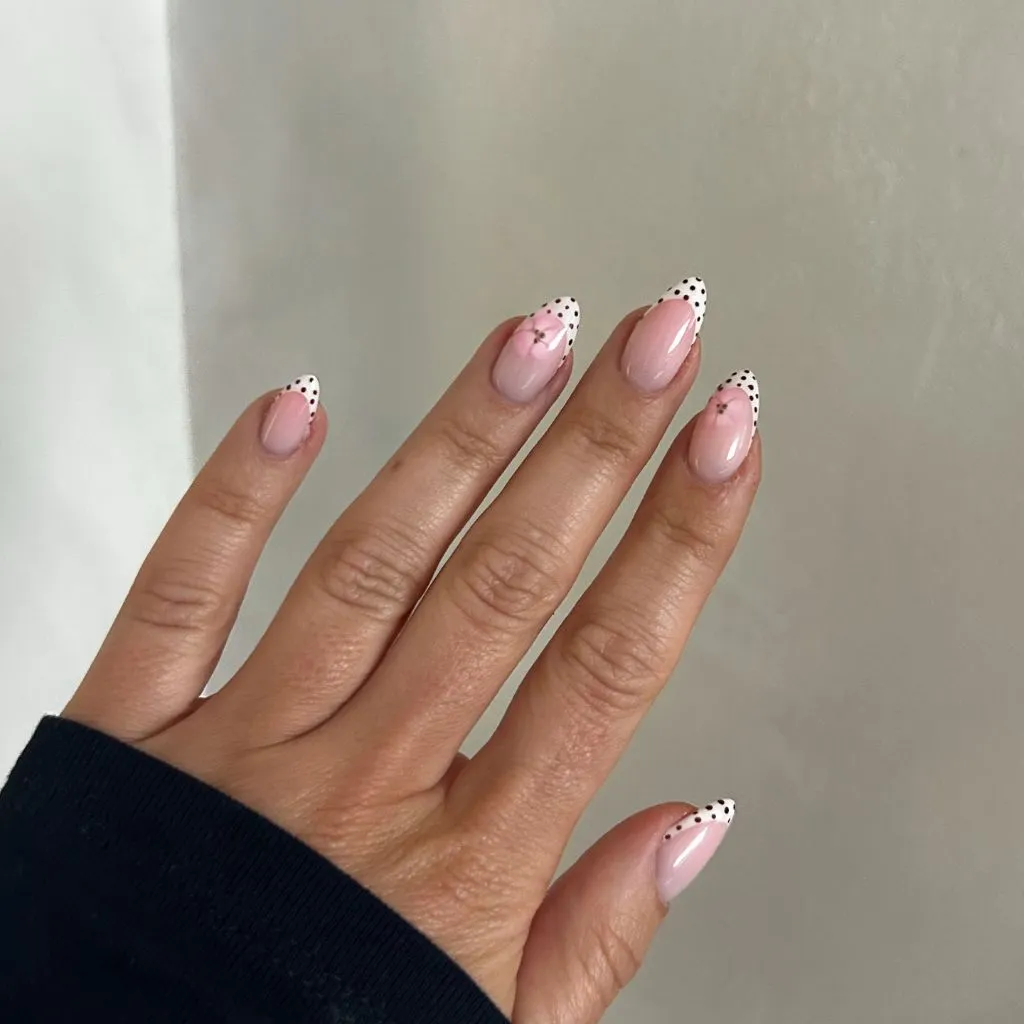
The sheer pink base visible through the center of each nail provides crucial breathing room. Without it, the dotted white tips would feel heavy; with it, the design has a lightness that makes it appropriate for everyday wear. The tiny florals near the cuticle add a feminine counterpoint to the graphic black-and-white pattern without competing for attention because they’re so small.
To get the Dalmatian dot effect, dip your dotting tool in black and press at slightly different angles and pressures — some dots should be rounder, others slightly elongated. The organic imperfection is the whole point. Paint your white tip first with a clean edge, then add dots only within the white section, keeping the pink base clean. This keeps the design structured even though the dots themselves are loose.
14. Sheer Black Lace Polka Dots
A translucent smoky-black base covers each nail, with black dots placed in an even grid on top. The effect mimics sheer lace or Swiss dot stockings — the skin tone shows through the base, and the dots create a textile pattern that looks more fabric than polish. A thin black outline traces the edge of each nail, framing the design like a finished garment seam. The matte-to-satin finish enhances the fabric illusion because it eliminates the high-gloss sheen that screams nail polish.
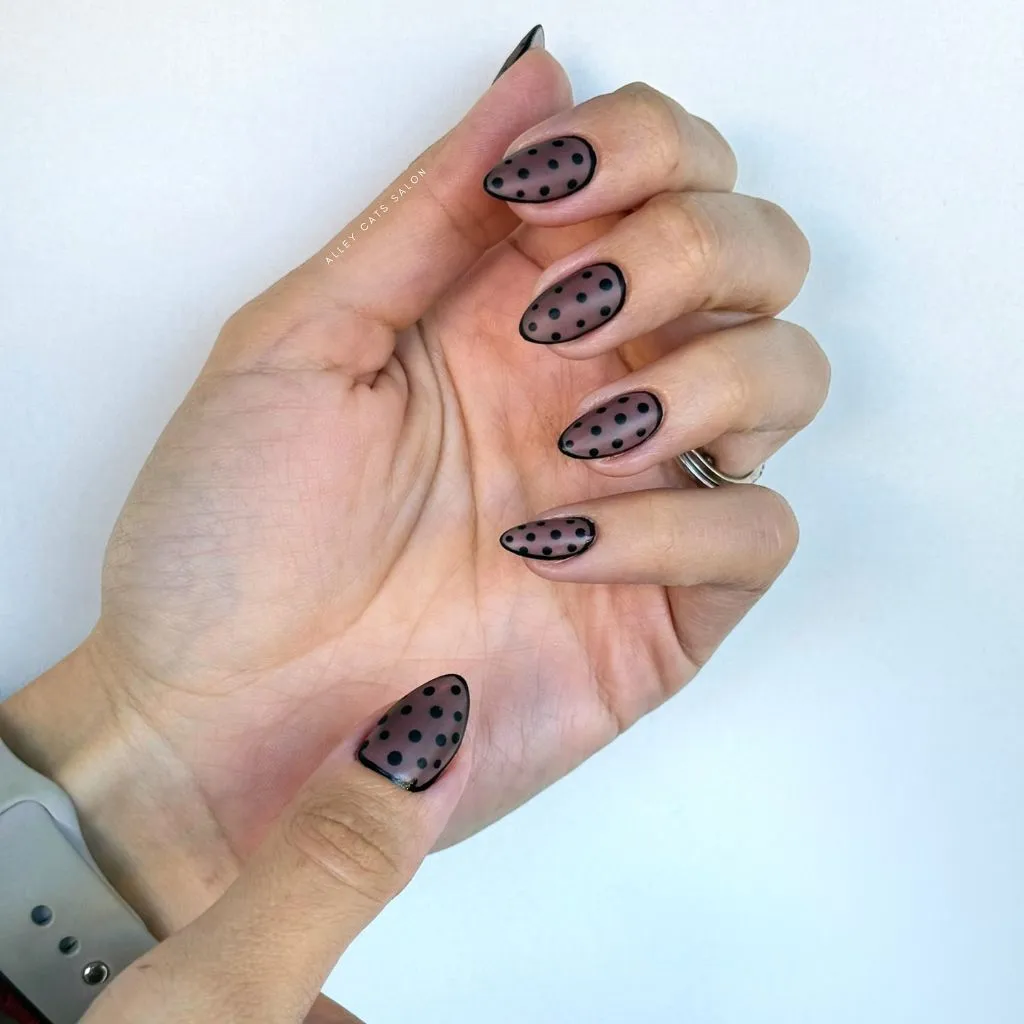
This design works because it leans fully into the fashion reference rather than trying to be two things at once. The dots, the transparency, the outline, and the finish all serve the same lace concept. There’s no competing element or contrasting accent — every detail reinforces the textile metaphor. That single-mindedness is what makes it read as sophisticated rather than as a standard black dotted manicure.
Achieving the sheer black base requires mixing a small amount of black gel polish with clear builder gel, or using a dedicated sheer black polish applied in one thin coat. The base should be transparent enough to see the nail bed clearly. Place your black dots using a small tool and keep the spacing perfectly even — the grid pattern is essential to the lace reference. A matte top coat is non-negotiable here; gloss would destroy the illusion. This concept could easily double as a wearable Halloween nail art idea when you want something dark but refined.
15. French Tips with Gold Foil Polka Dots
A classic white French tip manicure gets disrupted by metallic gold foil dots scattered across both the white tip and the bare pink base. The dots aren’t painted — they appear to be actual foil rounds pressed into the gel, which gives them a dimensional, reflective quality that flat polish dots can’t achieve. The gold catches light differently depending on the angle, creating a shimmering effect that elevates a familiar French shape into something occasion-ready.
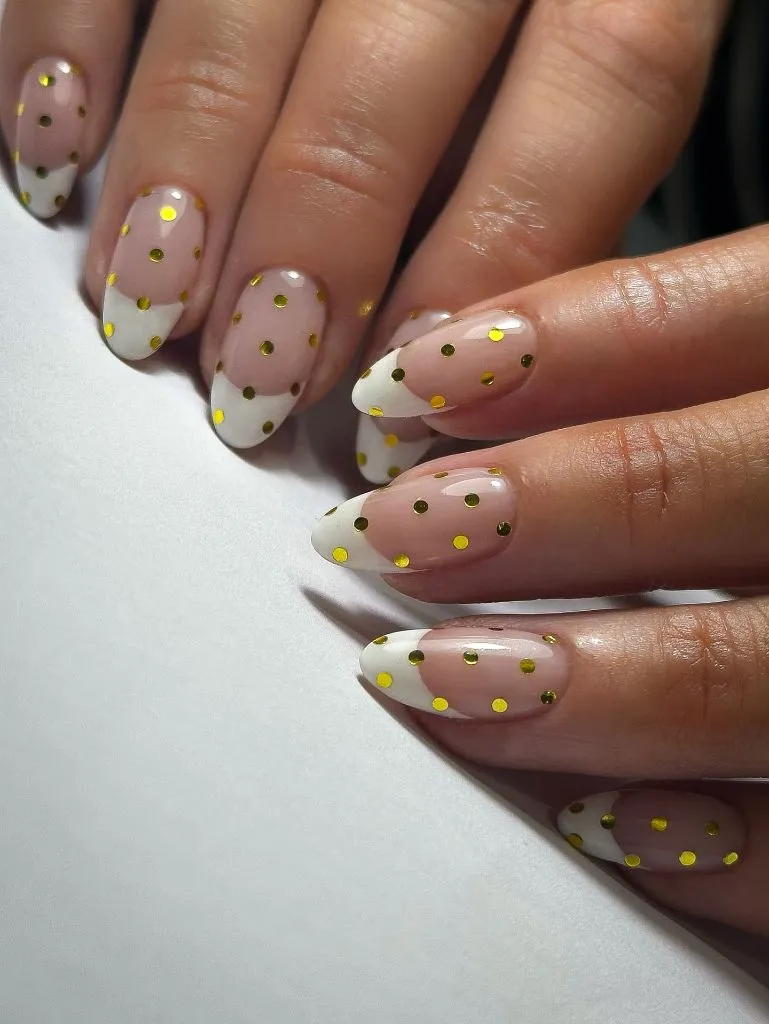
The design works because the gold foil dots don’t respect the boundary between the white tip and the pink base — they scatter across both zones, which unifies the two sections rather than letting them feel like separate blocks. If the gold appeared only on the pink or only on the white, the nail would read as two stacked patterns. The continuous scatter ties the whole surface together into one cohesive design.
To place foil dots, apply small circles of gel adhesive with a dotting tool, cure them until tacky, then press gold transfer foil on top and peel away. The foil will stick only to the adhesive dots, giving you clean metallic circles. Work on one nail at a time because the adhesive has a narrow working window. Avoid using too many dots — the elegance here is in the restraint, with enough space between foil rounds to let the French tip underneath remain clearly visible.
16. Neapolitan Ice Cream Dot French Tips
Three colors rotate across the nails in French tip form: pale yellow with dark brown dots, lavender pink with dark brown dots, and chocolate brown with cream dots. The combination immediately evokes Neapolitan ice cream — vanilla, strawberry, and chocolate — and the playfulness is entirely intentional. Each tip section is large enough to display four to six dots clearly, and the matte finish on the nude base contrasts with the slight sheen on the colored tips.
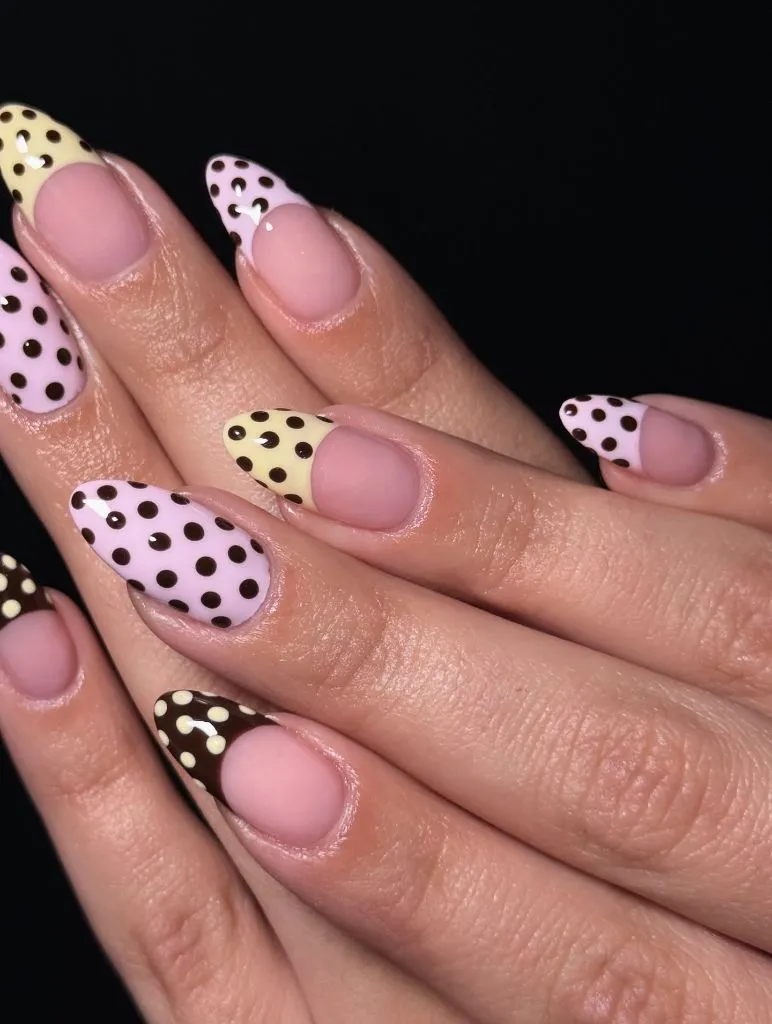
The three-color rotation works here because each shade occupies a different position on the color wheel — warm yellow, cool pink, and neutral brown — creating balance through variety rather than harmony. The consistent use of dark brown dots on the lighter tips and light dots on the dark tip provides a unifying thread that ties the three different tip colors together.
This is a set that benefits from planning the color distribution across all ten fingers before you start painting. Alternate the three tip colors so no two adjacent nails wear the same shade. Use a medium dotting tool and keep your dot count consistent — if one tip has five dots, they all should. The matte nude base is important because a glossy base would compete with the tips for attention; you want the eye drawn upward to the color and dots.
17. Rich Chocolate with Cream Polka Dots
A deep, warm chocolate brown covers all five nails uniformly, and cream-colored dots of identical size are placed in an even, slightly offset grid across every surface. There’s no accent nail, no variation, no French tip — just one color, one dot shade, and consistent execution across the entire hand. A chunky gold ring on the middle finger is the only accessory, and it complements the warm tones of the polish perfectly. The almond nail shape and the richness of the brown give this a decidedly autumnal, almost confectionery quality.
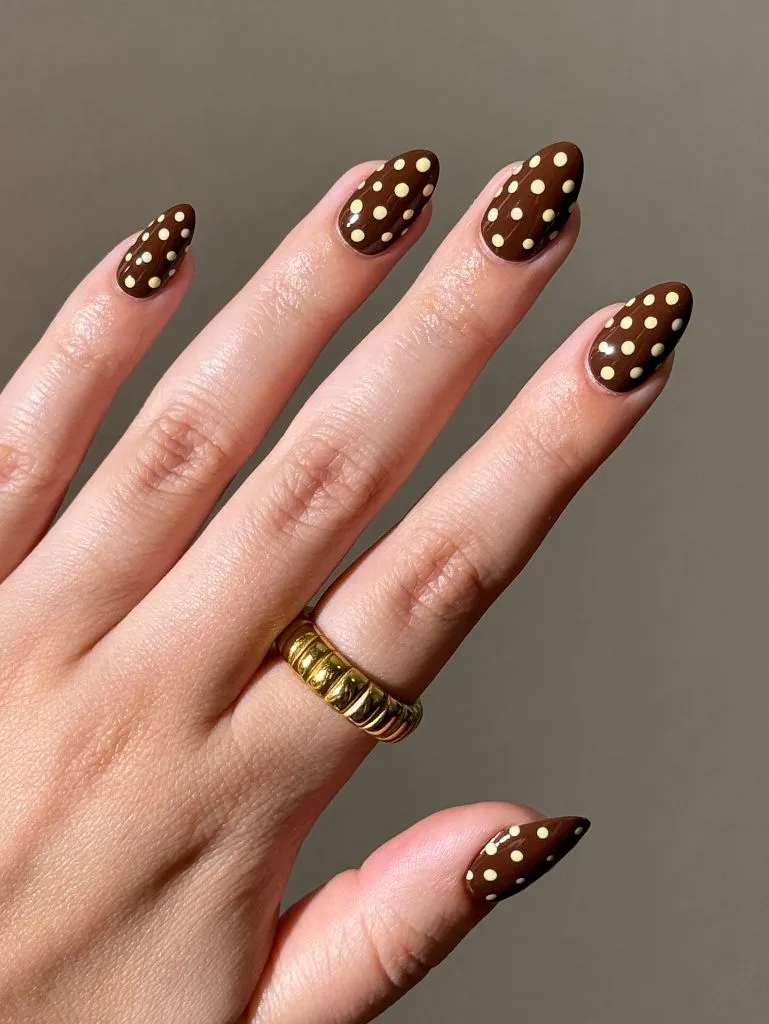
Uniformity across all ten nails creates a different kind of impact than a mixed set — it reads as deliberate and confident, like choosing a single statement fabric for an entire garment. There’s no decision fatigue for the viewer; you see the pattern once and understand the whole hand. That clarity is a form of elegance in itself.
This is one of the easiest polka dot nails to execute at home because there’s only one variable to manage: dot placement. Paint all nails in two coats of chocolate brown, cure completely, then work your way across each nail with a dotting tool loaded with cream polish. Start from the center and work outward, leaving roughly equal space between each dot. The only way to mess this up is with inconsistent dot sizes, so reload your tool frequently and practice on a palette first.
18. Yellow and Chocolate Dot Duo
This two-handed set alternates between pale butter yellow nails with small brown dots and dark chocolate nails with cream dots, distributing the two colorways evenly across both hands. The color pairing is unexpected — yellow and brown isn’t a combination most people reach for instinctively — but it works beautifully because the warm undertones are shared, creating a palette that feels like sunlight on wood. Gold rings on several fingers reinforce the warm metallic thread running through the whole look.
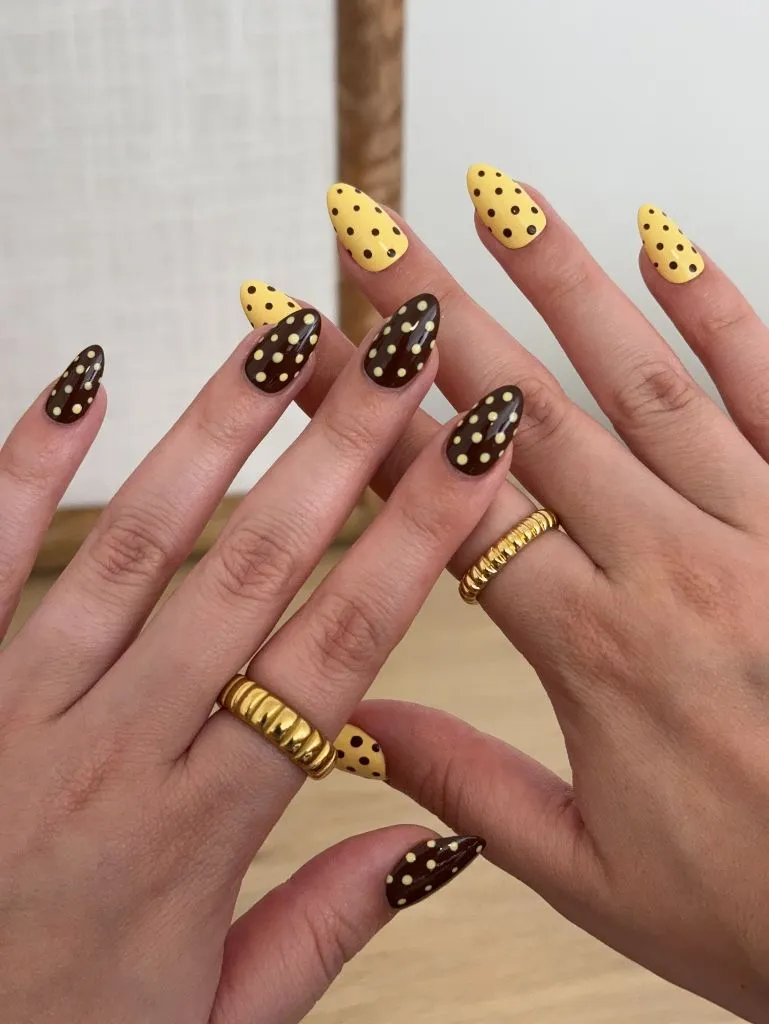
The alternating rhythm — yellow, brown, yellow, brown — gives the hands a visual beat that’s satisfying to follow. Unlike sets where each nail is different, this binary rotation is easy for the eye to parse, which makes it feel orderly even though the color combination is unconventional. The consistent dot size across both colorways is what locks the two palettes into one unified design.
When attempting an unusual color pairing like this, buy your two polishes at the same time so you can hold them side by side and confirm they share an undertone. A cool-toned yellow next to a warm brown would look dissonant. Apply each base color to alternating nails, cure, then dot the contrasting shade on each. This set proves that polka dot nails are a format flexible enough to absorb almost any palette you throw at them, as long as the undertones agree.
19. Cherry Red Polka Dots with Cherry Accents and French Tips
This set combines red-and-white polka dots, hand-painted cherry motifs, and dotted French tips into a cohesive red-and-white story. One nail wears a red tip section with white dots over a nude base; another features a full red base with white dots; a third shows painted cherry icons over a pink base with a white French edge; and an accent nail carries a small cherry icon alone. The red used across all nails is the same exact shade, which is the glue holding five different designs together.
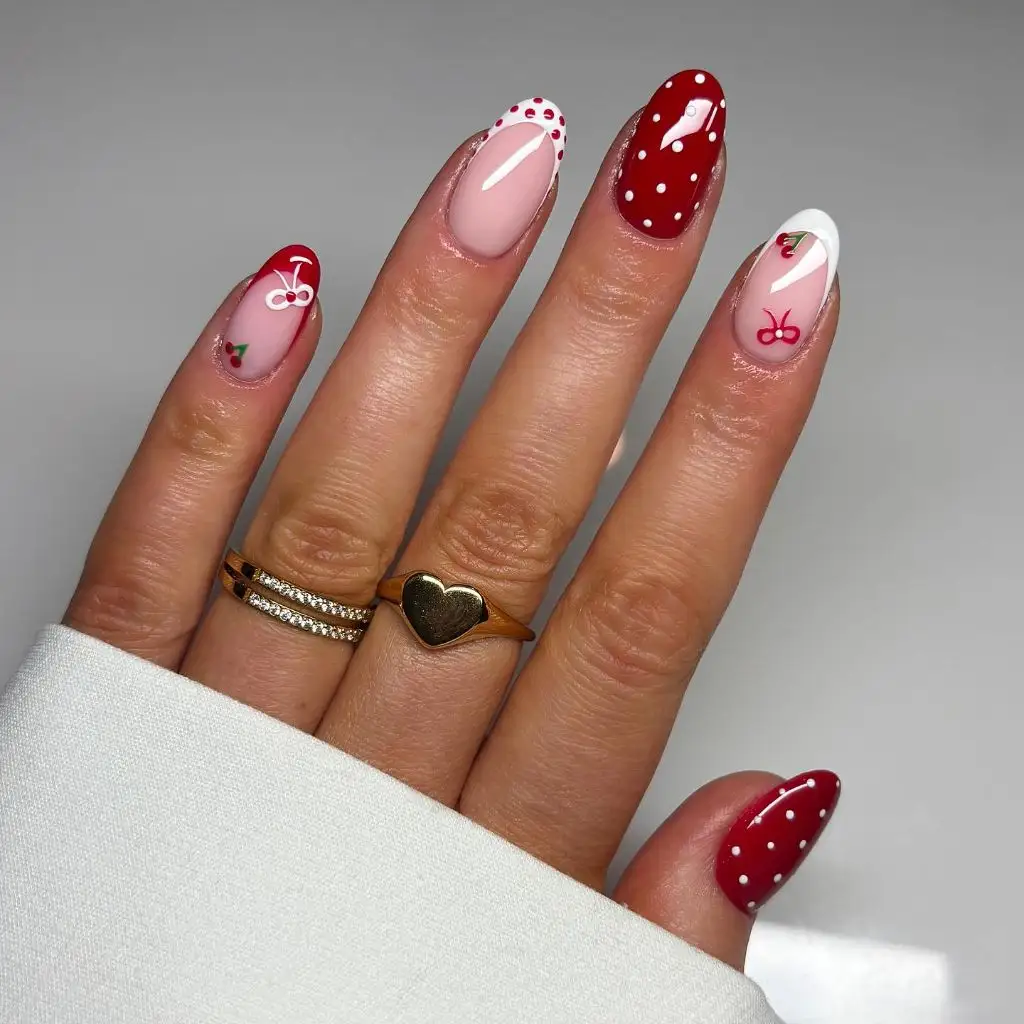
Having five different nail designs on one hand could easily look chaotic, but the single-color commitment — one red, one white, one nude — prevents fragmentation. The heart-shaped ring adds a sweet finishing touch that aligns with the cherry motif’s playful energy. Each nail functions as a different sentence in the same paragraph, written in the same voice.
If you want to attempt a multi-design set like this, the critical first step is choosing your hero color and committing to it across every single nail, no exceptions. Then sketch out which nail gets which treatment — allover dots, French dots, icon accent, and so on — making sure the most visually heavy design (the full red nail) sits in a position that anchors the hand, typically the middle or ring finger.
20. Nude and Black Polka Dot French Tips with Piping Detail
Square-shaped nails in a warm nude are paired with two distinct treatments: some nails wear a black polka dot French tip with a clean white border separating the black from the nude, while others carry black dots scattered directly on the nude base. The square shape reinforces the graphic, almost mod quality of the black-and-nude palette. The white piping detail along the edge of each black section is the defining touch — it turns what would be a simple color block into something that looks architectural.
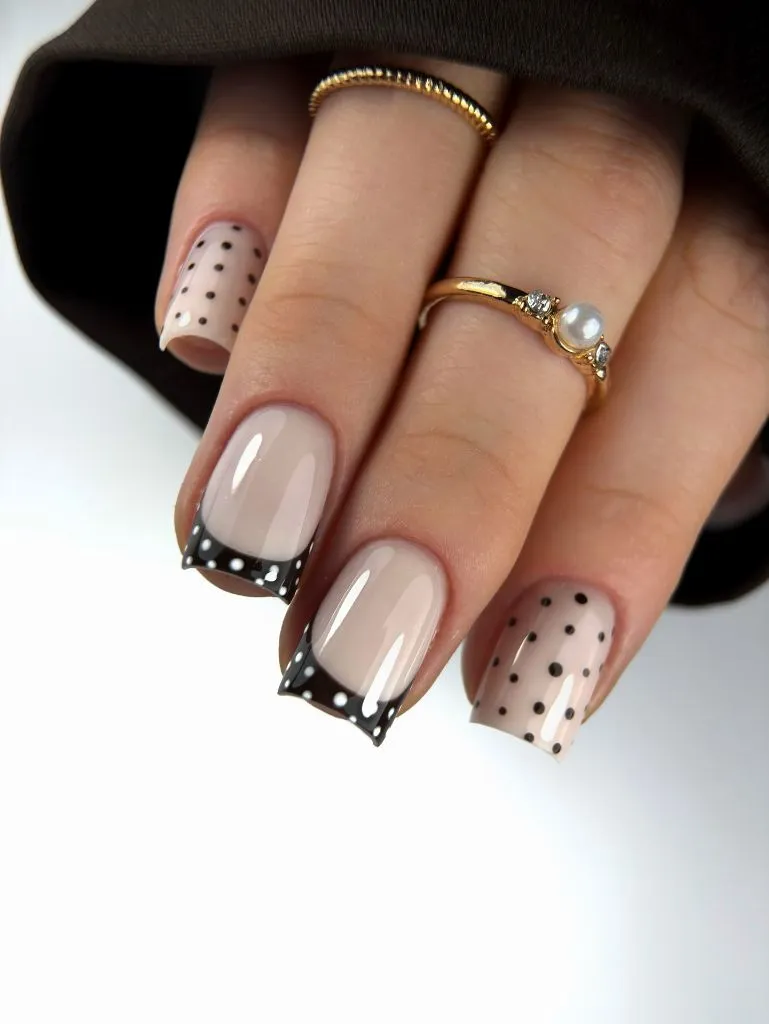
The white piping line is thin — maybe a millimeter wide — but it does enormous visual work. It sharpens the boundary between black and nude, gives each French tip section a finished edge, and introduces a third value (white) that prevents the design from feeling like a simple two-tone exercise. Without that line, the black tip would bleed optically into the nude base; with it, every boundary is crisp and intentional.
Use a striping brush to paint the white border before filling in the black tip section. This ordering matters — painting the white line over an already-cured black tip risks a rough edge. Lay the white line first, cure it, then paint the black tip right up to its boundary. For the dotted accent nails, scatter your black dots in an organic pattern rather than a grid to contrast with the structured geometry of the French tips.
21. Nude Base with Scattered Black Mini Dots
Both hands wear a warm nude-to-white base — some nails leaning more pink, others more cream — with irregularly scattered small black dots across every surface. The dots vary slightly in size, with some as small as a pinhead and others closer to a sesame seed, which gives the overall pattern an organic, almost speckled quality. The effect reads as a neutral pattern rather than a bold statement, making this one of the most wearable interpretations of polka dot nails you’ll find.
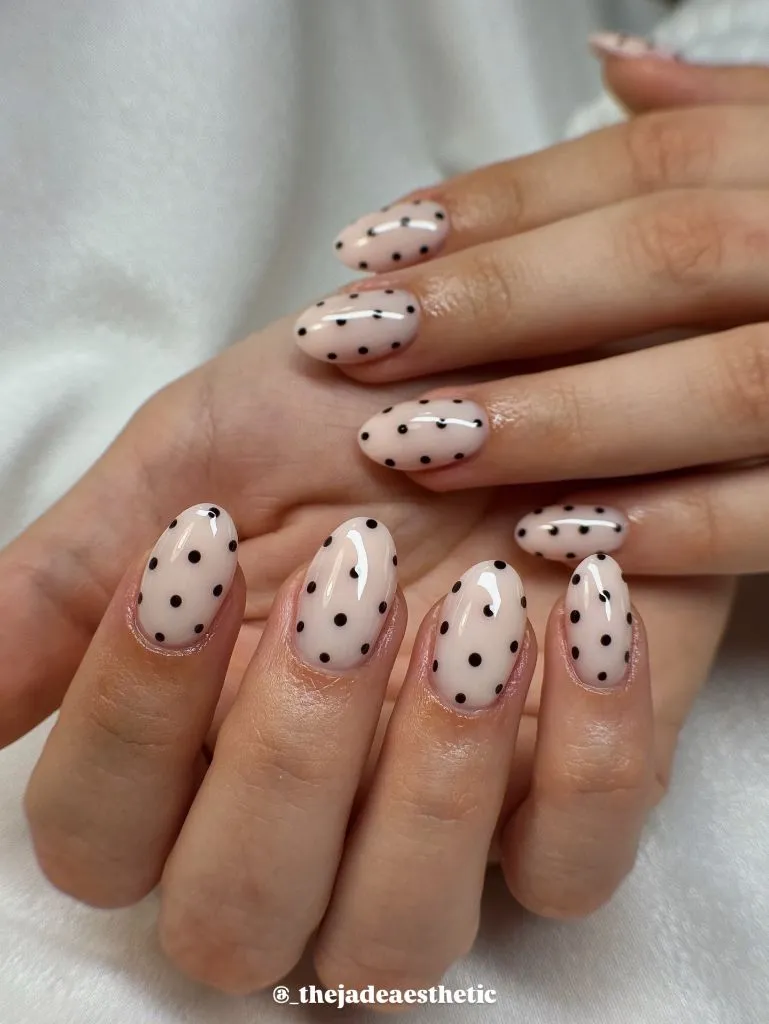
The slight variation in base color between nails — some warmer, some cooler — adds depth without disrupting the minimal palette. It’s the kind of variation you might see in a handmade ceramic glaze, where small imperfections signal craft rather than error. The rounded nail shape keeps everything soft and unforced, matching the casual energy of the scattered dots.
This is an ideal design for anyone who wants pattern without commitment. Apply your preferred nude in one coat, keeping it slightly sheer so the natural nail shows through. Then load a very fine dotting tool with black and tap it across the nail at random intervals, varying the pressure slightly to get that natural size variation. The key is to avoid clustering dots in one area — step back and look at the whole nail between every few dots to maintain an even overall distribution. If you enjoy this level of subtlety, fall dip nails offer another way to achieve understated seasonal polish.
22. Brown and Baby Blue Reversible Dot Tips
This set uses the same reversible French tip strategy as the brown-and-white set earlier, but swaps in a soft baby blue for the white. The result is warmer and more unexpected — brown tips with blue dots sit alongside blue tips with brown dots, all over a bare natural base. The blue introduces a coolness that keeps the brown from feeling too heavy, and the brown grounds the blue so it doesn’t float into pastel territory.
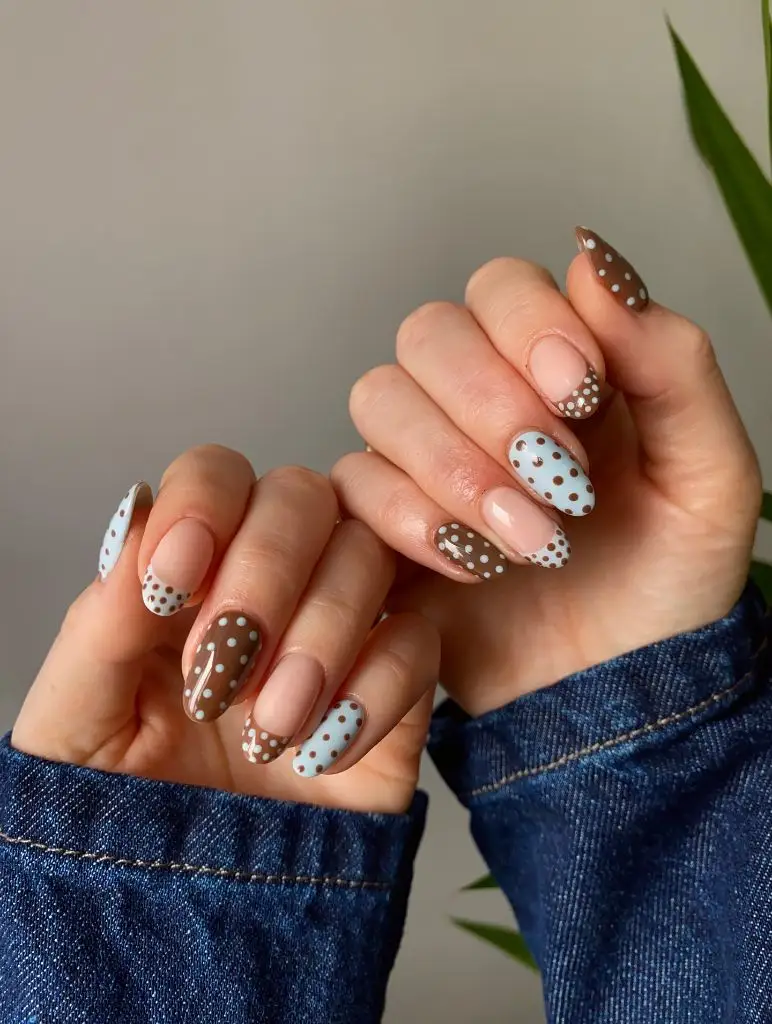
The color pairing here is doing something subtle: brown and baby blue sit on opposite sides of the warm-cool spectrum, but neither is so saturated that the contrast feels harsh. They meet in the middle, creating a palette that reads as sophisticated neutral rather than bold statement. The polka dots further soften the relationship by breaking each solid color into a pattern, reducing the visual weight of both.
For this set, the bare nail section between cuticle and tip needs to be long enough to provide a clear neutral break — at least 30 to 40 percent of the nail surface. If the tip sections start too close to the cuticle, you lose the breathing room that makes the design elegant. Paint your tip shapes in alternating colors, cure, then dot the contrasting shade on each. This is a particularly strong option for the transitional weeks between summer and fall when you want warmth without going full autumnal. For more ways to bridge that gap, see ideas for polka dot fall nails.
23. Pastel Pink with Black Mini Dot Grid
Short square nails wear a soft, opaque pastel pink covered in a tight grid of small black dots. The square shape and short length give this a clean, modern feel — there’s something almost architectural about the combination of sharp corners and repeating circles. The pink is fully opaque and slightly cool-toned, which keeps the sweetness in check, and the black dots are uniform in size and spacing, creating a pattern that reads as textile rather than hand-painted.
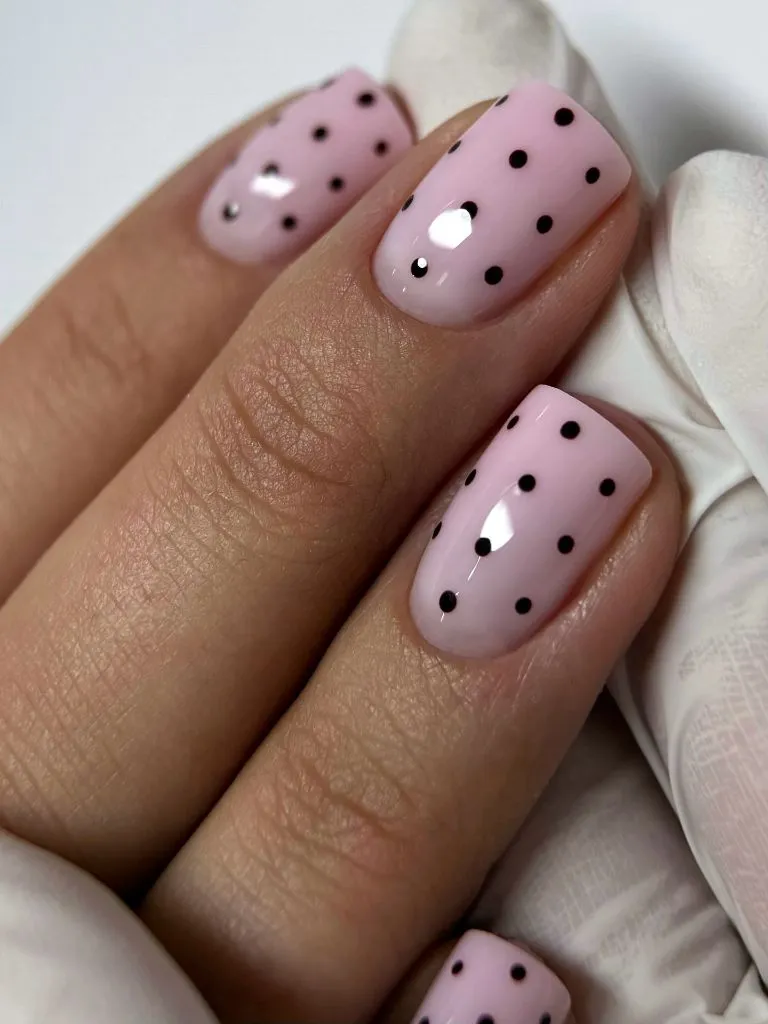
The tight dot spacing is what distinguishes this from a scattered dot design. Where sparse dots feel casual and organic, a dense grid feels intentional and graphic — more like a printed pattern than a freehand embellishment. The choice to keep the nails short amplifies this graphic quality because there’s less surface area, making the pattern density feel higher and more impactful.
For a grid this even, consider using a dotting guide or placing dots one row at a time, starting from the cuticle end and working toward the free edge. Allow each row to cure before starting the next if you tend to smudge. The pastel pink base should be fully opaque in two coats — any sheerness will muddy the crispness of the black dots sitting on top. This is also a set that benefits enormously from a high-gloss top coat, which seals the dots smooth and gives the surface a polished, lacquered finish.
24. Burgundy and Blush Inverse Polka Dot Set
One hand wears blush pink nails with small burgundy dots; the other wears deep burgundy nails with small white dots. The two hands create a before-and-after effect, like flipping a fabric swatch to its reverse side. Both hands use the same almond shape and the same dot size, and the consistency in those two variables is what makes the inverse work — your eye recognizes the pattern as the same design expressed in two different values.
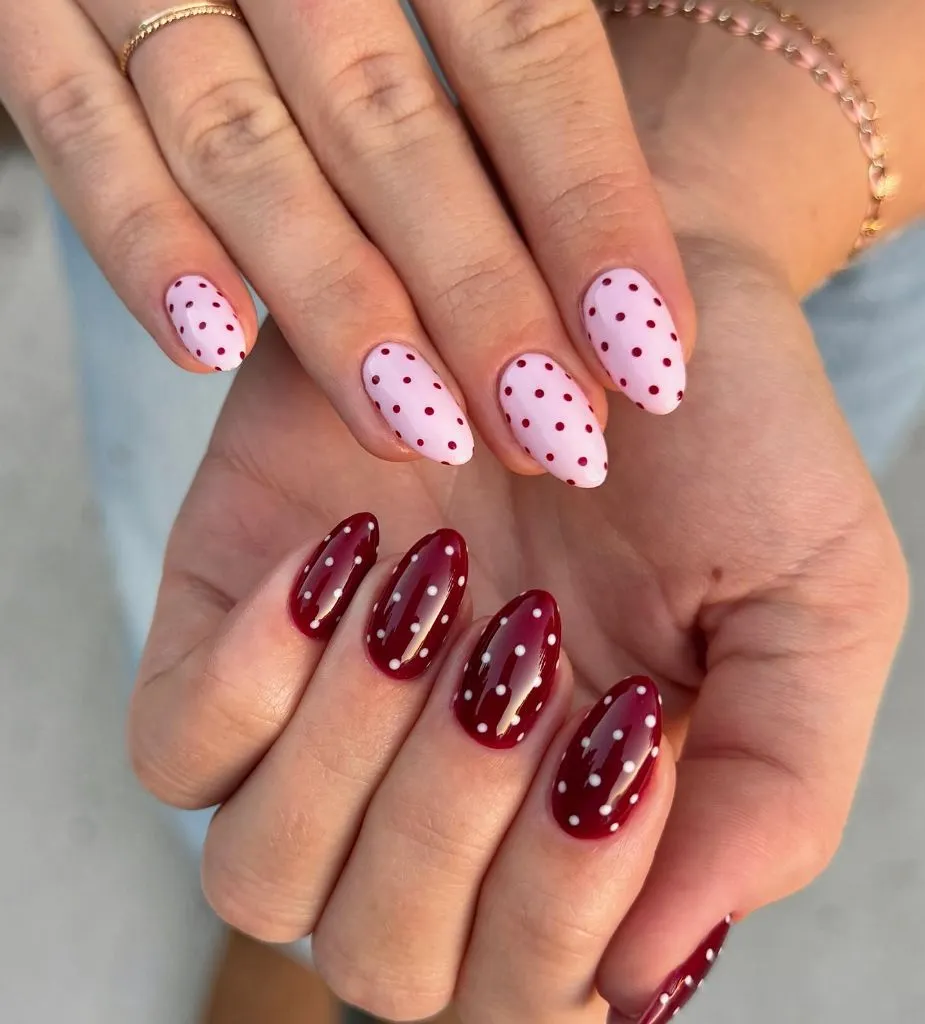
The burgundy-on-blush hand reads as delicate and daytime-appropriate, while the burgundy-with-white-dots hand reads as bolder and more evening-ready. Wearing both simultaneously gives you a single manicure that’s effectively two moods at once, which is surprisingly practical — it means the nails complement a wider range of outfits and settings than either version would alone.
To execute this cleanly, use the same burgundy polish on both hands to ensure color consistency. The blush pink base for one hand should be warm enough to sit comfortably next to the burgundy without looking washed out. Place dots at the same density on both hands — count them if you need to. The visual trick of the inverse only registers if the two hands are clearly mirrors of each other, so any inconsistency in dot size or spacing between hands will weaken the effect rather than enhance it.

Hi, I’m Zoey Mitchell, the creator of ChicStyle Blog.
I share simple, wearable outfit ideas, hairstyles, nail trends, and beauty tips that feel natural and easy to recreate.
This blog is where I explore everything that makes a woman feel put together and confident every day. I’m not an expert — just a woman who genuinely loves style, mixing looks, and discovering what works.
If you love effortless fashion with a personal touch, you’ll feel at home here.